Category Archives: Lightroom

LIGHTROOM 9.2 RAW DEFAULTS

When you open a RAW image in Lightroom, what you see on screen depends on the default starting points you have chosen.  One option is just to accept Adobe’s default settings.  Or you can make your own defaults.  Remember, these default settings are not set in stone — a RAW file is just the ones and zeros used by a computer until those bits and bytes are rendered in some fashion so that the file can be seen.  Default settings do not make a finished file, but just an initial rendering.  How do you want an image to appear when it first opens on your monitor?

Up until this latest Lightroom update the way you set a default was to open an unprocessed RAW file in the Develop module and make the choices (move the sliders, check the boxes, etc.) that you wanted to be applied initially to files taken by a particular camera model.  Then by holding down the Alt/Option key the Reset button changed into “Set Default.”

The 9.2 update changed this process, and the Alt/Option bit no longer works.  If you had created your own specific defaults, these do not carry over into 9.2.

I use three different Nikon camera bodies, a D5, a D500, and a D850.  I had different defaults for each of these, mainly in the amount of sharpening applied, so I needed to recreate these.  It’s actually very easy.

Open any file in the Develop module.  Set the sliders the way you want.  Go to Presets on the left side of your screen, click on the + symbol to save a new preset, and save with a unique name as a User Preset.  I created presets for my three cameras saved with the obvious names of D5, D500, and D850.

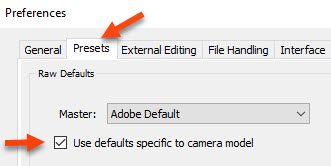
Go to the Presets tab in Lightroom’s Preferences.  Check “Use defaults specific to camera model.”
Select your camera and click the Default box immediately below.   Click Preset, then select the User Preset you made for that camera.
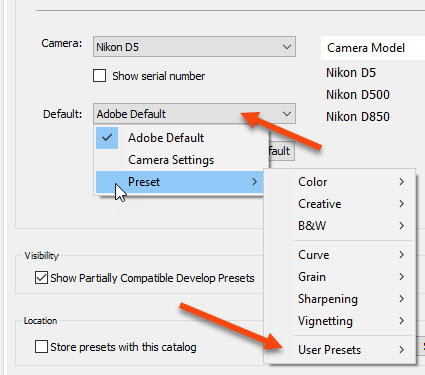
Your default preset shows up and will be automatically applied to files taken with that particular camera. 


LIGHTROOM AND DUST SPOTS (AGAIN)

Back in January 2014 I wrote a blog piece about Lightroom’s “Visualize Spots” feature, which had just been introduced with the then-new Lightroom 5.  Well, here we are five years later and at Lightroom Classic CC version 8.2.  I recently finished teaching a workshop and was somewhat shocked that over half the attendees — regular Lightroom users — did not know about Visualize Spots.  So to repeat myself….  Visualize Spots does exactly as its name suggests; it shows you all the dust spots on your image, including many that you might otherwise miss.

In the Develop module, select the Spot Tool.  It’s the second tool from the left in the Develop tool bar (the keyboard shortcut for the Spot Tool is Q).

Look at the bottom left, just below your image, and you will find the Visualize Spots checkbox.  Click on this, your image changes to black and white, and all those dust bunnies show up.  Move the Visualize spots slider to increase or decrease the sensitivity, and start spotting.

You can change the size of the Spot Tool by using the scroll wheel on your mouse.  You can change the feathering of the tool by holding down the Shift key while using the scroll wheel.

And now a neat little trick: set your image view at 100%, or 1:1, and navigate to the upper left corner of your image.  Use Page Down (Windows: PgDn on a full-size keyboard; Mac (and most Windows laptops): Function + down arrow) to move the area shown on screen by exactly one screen view.  When you get to the bottom of the image, do Page Down again, and the screen view moves over and up to the top.  Keep doing Page Down until you’re covered the entire image.  This little trick means you’ll never miss any section of the image.

NIKON D850 LENS PROFILE PROBLEM?

Recently I was doing some night sky photos using my D850 and the Nikon 20mm f/1.8.  When I looked at the shots in Lightroom I noticed something odd: in the darker areas, especially toward the corners of the frame, a series of faint concentric rings were visible, apparently emanating from the center of the image.  I did not have any sort of filter on the lens, so this could not be some sort of interference pattern.  What was happening?

I started doing a lot of testing.  I finally discovered that these “rings” would disappear if I unchecked the “lens profile correction” in the Lens Corrections tab in Lightroom’s Develop module.

Was this a bad lens profile or what?  I considered some options:

  • I first noticed this while working on my laptop which has a high resolution 4K screen.  Was this just a monitor artifact?  I opened the same files on my desktop computer which has a much larger, but slightly lower res monitor.  Nope, the circles were still there when “lens correction profile” was on.
  • Was this only a factor of high ISO in dim light?  I needed some control shots, done in dim light.  With my camera firmly mounted on a tripod I snapped a series of images inside my garage with the garage door closed and the overhead lights turned off.  I kept the lens at f/2 and went from ISO 100 to ISO 12800 in one stop intervals, with shutter speeds from 30 seconds up to 1/4 second.  The rings were still visible in all the images when I turned on the “correction profile.”
  • What about shooting in more “normal” lighting conditions?  I went outside and shot a series looking down my street, at different exposure values and different ISOs.  I could not see any problem in the images when the profile was on or off.
  • What about aperture settings in dim light?  Back to the garage and another series of frames, this time done at ISO 6400 and apertures from f/2 to f/11.  No change, turn the profile on and the rings were still there in all the shots.
  • What this a problem with the 20mm?  What about other wide angle lenses?  More shots in the garage, this time with my Nikon 14-24mm.  As soon as the lens profile was applied in Lightroom I could see the rings, although fainter.  I also tested the only other wide angle lens I own, the Nikon 16-35mm, and the rings were back.  Again, if I unchecked “lens profile correction” the rings disappeared.
  • What about the lack of an anti-aliasing filter on a high-res body?  I no longer own a D800E or a D810.  I didn’t own the 20mm f/1.8 back when I had those cameras, but I did have night sky shots taken with the 14-24mm.  I pulled those up, looked at them carefully, and flipped the profile correction on and off.  No rings no matter if the correction was on or off.

What on earth was going on here?  Was this a problem specific to the D850?

Now totally frustrated, I looked at my Develop settings in Lightroom.  If sure would be great to be able to use those lens profile corrections to solve the distortion and vignetting problems that all wide angle lenses have.  I discovered that if I set the sharpening Amount slider to zero the rings disappeared, but in my normal RAW file workflow I generally do want to apply some sharpening.  Back at the Lens Profile tab, I left the “profile correction” on, but pulled the sliders for Distortion and Vignetting at the bottom of that tab to zero, effectively negating the profile.  Sure enough, the rings disappeared.  But wait…how about separating those two sliders, adjusting one but not the other?  The culprit seemed to be the Distortion slider.  I could have the Vignetting slider all the way to the right, as high as possible, but the moment I moved the Distortion slider from the zero position the rings started to show.

As I stated earlier, I’ve only seen this in very low light shots, and haven’t tried any tests with longer focal lengths.  Has anyone else shooting with a D850 seen similar results?  Right now I’m thinking that when I’m processing images taken with the D850 in very low light I will leave lens profile correction turned on, but pull that Distortion slider to the far left before slowly moving it to the right.

Nikon D850 Focus Shift

I’ve been using the Nikon D850 since October and can say I’m very impressed with the camera, particularly for my landscape work.  Two features in particular stand out:

  1. The “silent shutter” mode in Live View.  I should mention that I use Live View a lot when I’m photographing static subjects, and it’s a given that I’m working from a sturdy tripod.  In “silent shutter” the shutter is fully electronic — hence no shutter curtain movement at all — and of course when in Live View the mirror is up.  Eliminating the mechanical shutter and eliminating any mirror movement means eliminating two sources of possible vibration.  Turn on “silent live view photography” in the Photo Shooting menu, and select Mode 1 which gives a full-resolution, non-cropped image.
  2. The “focus shift shooting” option, also found in the Photo Shooting menu.  Here the camera takes a series of shots, slightly changing the focus point for each frame.  The resulting images can be “stacked” as a composite, thus increasing the in-focus area of the final photo.  This “stacking” must be accomplished with software in post-production; it’s not done by the camera.  The individual photos can be taken at a lens’s sharpest aperture, around f/5.6 or f/8, eliminating diffraction problems while yielding greater depth of field.

Turning on “focus shift shooting” gives you a number of choices:

  • The number of shots (up to 300)
  • The focus step width (1 through 10, undefined what these actually mean)
  • The interval until the next shot (between 0 and 30 seconds)
  • Exposure smoothing
  • Silent photography
  • Starting storage folder

Here are my choices, for landscape work:

  • Number of shots:  Set this to around 50, as the number really doesn’t matter.  The camera will stop with the lens focusing ring hits the end of its travel.  I have my camera set at 50 and most of the time the actual number of usable frames is between 5 and 10.  FYI, you will often find some extra frames where the camera has gone before the far point in your composition, so nothing is in sharp focus.  No big deal, just delete these frames when you see them later on your computer.
  • Focus step width:  I have mine set at 2, as I want to work at those prime apertures on my lenses, so I want to make sure each frame’s depth of field overlaps with that of the preceding or following frame.
  • The interval until the next shot:  I have this at 0.  And VR is “off” on the lens in use.
  • Exposure smoothing:  Off, as I do all my focus stacks in manual exposure so that all the frames already match in total exposure.
  • Silent photography:  On.
  • Starting storage folder:  I don’t use this.

So here is the easiest way I know to work.  Leave “silent shutter in Live View” turned on.  Add “focus shift shooting” to My Menu, and position it as the top most listing.  In the Custom Settings menu, Custom Control Assignment (choice number F1 in Custom Settings), set the Fn2 button on the camera rear to “access the top item in My Menu.”

In the field, turn on Live View, compose your image, set the exposure, and focus on the nearest past of the frame.  Press Fn2, select Start, and the camera begins shooting in silent mode.  When you’ve done this once, if you don’t need to change any options, the next time you can just press Fn2 and then OK twice.

Just to cover yourself, shoot several stacks of any one composition.  How to tell where each stack beings?  Wave your fingers in front of the lens and shoot one frame in Live View before you push Fn2.  Important reminder (and I speak from experience here):  remember to refocus on the closest point for each stack.

OK, now to the actual stacking.   I’m assuming you’re shooting RAW files, and you are, right?  You could use Photoshop.  If so, you need to first process the individual images and then open them as layers in Photoshop.  Select all the layers and do Edit > Auto align followed by Edit > Auto blend.  This method works OK, but there are two problems:  the final file is no longer a RAW file, and with complex subjects you will probably discover a number of stacking artifacts (blurry areas, that is).

In my opinion, a better choice is to use a separate stacking program and I would recommend Helicon Focus.  Google for a discount code to knock the price down about 20%.  Helicon works directly from Lightroom, and if you install Adobe’s free DNG Converter, Helicon has a mode called Raw In – DNG Out.  You export the selected images from Lightroom to Helicon in their original RAW state.  I’ve found that almost all the time running Helicon at its default settings works fine.  Most of the time Helicon’s rendering intent mode B is my choice.  If it leaves artifacts I try mode C.  When Helicon finishes, the resulting file can be saved right back into Lightroom as a DNG, and processed to taste as you would any RAW file.

NIK

In case you missed this, it’s now official.  The Nik suite of plug-ins will not be developed in the future.  From the banner at the top of the Nik website:

“We have no plans to update the Collection of add new features over time.”

The collection is still free to download and use, but the real question is about compatibility in the future, with either Photoshop/Lightroom upgrades or changes in Windows and Mac core OS versions.

TECH TALK: LIGHTROOM/PHOTOSHOP

This post is going to be a bit techie.  OK, don’t say I didn’t warn you up front.

I was surfing the Web recently and ran across a blog post by a well know photographer who does not use Lightroom.  One major point made in the post was the question of why would anyone use Lightroom at all (aside from its cataloging feature) since Lightroom shows percentages for R, G, and B values,  Yes, mouse over an image in Lightroom’s Develop module and the readout is indeed in percentages.  Other RAW file converters show numerical values of 0 to 255 for each of the color channels.  Doesn’t this make using one of those converters better than working with Lightroom?

Most RAW conversion software makes you select a color space.  For example, let’s consider Adobe Camera Raw (ACR).  ACR is a separate program, accessible from Photoshop or from Bridge (which you now have to download from Adobe, rather than it being automatically included with Photoshop).  Bridge is a browser, the same as Window’s Explorer or Mac’s Finder, while Photoshop is a pixel editor.  ACR is a separate in-between software program.  When you open a RAW file in ACR, it needs a color space to use.   In simplistic terms, a color space is a group of colors out of all possible colors.  Remember when you were a kid and your parents bought you a box of crayons?  There were different boxes available, holding just 8 crayons up to 64 crayons.  Yep, more crayons, more possible colors.  No matter how you worked with the 8 crayons, you could never have the possible options and mixtures that the big 64 crayon box held.  It had a larger color space.  The basic digital color spaces are sRGB, Adobe RGB, and ProPhoto RGB.  Think of these as small, medium, and large.  Open an image in ACR, and immediately below the image window is a clickable link:

Note that the default is sRGB, the “small” color space.  Click on this link, and Workflow Options opens where you can select the color space and bit depth you want.

Whatever you select, make this your RGB working space over in Photoshop’s Color Settings (you might notice that the default in Photoshop is also sRGB).  Personally I use ProPhoto RGB in both ACR and Photoshop.

OK, so we finally get to where Lightroom differs from other converters.  You ever notice that Lightroom does not offer a choice of color spaces?  Internally it uses a variety of ProPhoto RGB.   But Lightroom differs from those other converters because it is a parametric editor.  OK, so what’s that?  In simple terms, it sums up processing instructions, which are not applied to an image until that image is either converted or exported through that instruction set into an actual editable file format.  Open an image from Lightroom into Photoshop, and it is no longer a RAW file.  A file in Photoshop can’t be saved out as a RAW file, but only in a standard graphics file format.

Well, at last we’re back to the question about those R,G, and B percentages.  Because Lightroom does not assign a color space, it cannot show numerical RGB values, since those numerical values depend on the color space in use.  Open a RAW image into some other converter besides Lightroom, mouse over the image, and read the RGB values for any one spot.  Now switch to a different color space.  The RGB readouts for that same spot will be different.  You have to specify a color space to talk about RGB numerical values.  Do I really care about this one way or the other?  No, not at all.  Photography is a visual art, not a bunch of numbers.  Use a quality calibrated monitor, look at the image, and adjust to taste.

In that same blog post I mentioned it was implied that not using Photoshop was a big mistake.  Well, I partially agree.  Photoshop does allow workflow options, such as layer masking and luminosity selections, that no RAW file converter currently allows.  But wait, this is not an either/or question.  It’s not a choice of Lightroom or Photoshop no more than it is of DPP or Photoshop, or of Nikon Capture or Photoshop.  Personally I find Lightroom’s user interface incredibly easy to use, plus I use the database feature to catalog all my image files.  But I also want Photoshop for fine-tuning images.  For me it’s a combination of Lightroom and Photoshop (and a calibrated monitor).

LIGHTROOM AND TRAVEL

How does one coordinate Lightroom used on a laptop when traveling, with a master Lightroom catalog back in the office?  I’ve written about this before (see my blog for October 2, 2012) but the topic keeps coming up at workshops and on tours, so….

I have one main master Lightroom catalog for all my images, which resides on my desktop computer in my office.  That master catalog is on an internal drive (a different drive than the internal SSD drive I use for all my programs).  A backup copy of this master catalog is made to another internal drive (automatically done by Lightroom when I exit the program), and a third copy of the catalog is on a small external USB drive.  Yes, I’m a bit paranoid about loosing all that data.

I have another Lightroom catalog named Travel on my laptop.  When I’m on the road, I download images using Lightroom, in the exact same format structure I use for the image files back in my office.  As the files are downloaded, Lightroom automatically renames the files and adds my copyright information, using templates I’ve created in Lightroom.  My naming template is a YYMMDD_camera-generated-file-name-and-number format, so individual files appear along the lines of 150624_D4S_4752.  Nikon lets you set camera names in the menu system to a three character code, so my cameras are named D4S and D8T.  Yeah, real original thinking there.  Image files are always downloaded into a  _Photos folder (the underscore makes it the topmost folder in my laptop’s directory), into a subfolder named by month and location of shoot.  06 Namibia would by a June trip to Namibia while 09 Denali would be a September shoot in Denali.  Each day’s images are automatically sorted as Lightroom reads the file metadata, makes YYYY-MM-DD folders as needed inside the month-shoot folder (the 06 Namibia or 09 Denali folders), and puts the correct images into the correct folders (I always have my cameras set to the local time, which in turn means all images will be correctly sorted by date).  Once all these parameters are checked in Lightroom they remain as set, so the only thing I ever have to change is the name of the month-shoot folder.  I flag any images I work on in Lightroom, highlight those images, and save all metadata to file by doing Ctrl/Command + S.

While on the road I copy every day’s take to two small external USB powered hard drives, so that by the end of the trip I have three duplicate copies of all my images.  Since the files are already in the organization I use in my office, all I have to do once I get home is to copy the image files to their correct location on my master hard drives, and to add the trip catalog to my master catalog.  I open the Travel catalog on my laptop, select the folder with the trip images, and do File > Export as Catalog, saving the exported catalog on one of the small USB drives.  I make sure to include the image previews.  Since the image files on the USB drive are all current with the correct metadata saved to them, there is no reason for me to do what Lightroom calls Export negative files (“negative files” is Adobe-speak for the actual images).

Back in the office I plug this drive into a USB port on my desktop computer, and use my operating system to copy the image shoot folder, which has all the photos, over to the correct date location on my main hard drive array.  Then I open my master Lightroom catalog, and do File > Import from Another Catalog, and select the catalog on the USB drive.  When this is finished working, I disconnect the small USB drive, at which time Lightroom want to know where the files are located since the imported catalog still thinks they are back on my laptop.  I point Lightroom to the correct image folder I’ve copied over, the 06 Namibia folder or whatever it is, and I’m done.  The backup software on my desktop computer automatically kicks in, and backs up my new images.

When I’m positive that all is well with my desktop system, I remove all the photos from the Travel catalog on my laptop, so that I can reuse the catalog shell again with all my preferences still set.  I reformat the USB drives, reset the time in my cameras, and I’m good-to-go on my next adventure.

LIGHTROOM CC: ADDITIONAL HDR INFO

In my last post I should have mentioned one important fact about the new “merge to HDR” feature in Lightroom.  When working on the resulting DNG file in Lightroom, the exposure slider now offers plus/minus 10 stops of exposure, a 20-stop exposure range, double the standard amount.  This is reminiscent of working with HDR Pro in Photoshop; see my August 2014 post entitled “HDR (A DIFFERENT WAY).”

LIGHTROOM CC (LIGHTROOM 6)

Lightroom CC was announced today.  If you’re like me and have subscribed to the photographer’s Lightroom and Photoshop package, a notice should appear in your desktop Creative Cloud app.  Adobe’s servers are swamped, so this might take a while.  The new Lightroom is also available as a standalone perpetual license program.

Downloading and installing the new version of Lightroom was easy for me.  No problem, until I tried to open the new program.  I clicked on the desktop icon, and nothing happened.  If this is your experience, there is an easy fix:  sign out of your Adobe account via the “preferences” in the desktop CC app (click on the gear icon or the drop down triangle in the upper right) and sign right back into your account.


Lightroom CC has two new features which are of interest to me.

1.  A brush tool option has been added within the graduated filter.  Add a grad just as you did in earlier versions of Lightroom, and then select the brush option within the grad filter, hold down the Alt/Option key, and brush over the image area where you do not want the grad filter applied.  Hey, it’s an editable filter!

2.  Merge to panorama can now be accomplished within Lightroom.  This can be done using RAW files, and the composite image is saved as a DNG file…which means that the resulting pan image is still a RAW file, and can be processed non-destructively in Lightroom.  Select the files you want to merge into a pan, and do Photo > Photo Merge > Panorama. Lightroom does the merging, and saves the merged panoramic in the same folder as are the component files.  It does add -Pano to the end of the combined image’s filename, a feature I’m not really keen about.  I’ve always worked by selecting the images in Lightroom, then opening them in Photoshop to merge images into panoramics, and finally doing a “save as” while added a P_ at the start of the pan’s filename.  I’ve got a smart collection in Lightroom which automatically sorts out all my panoramic images, all the files that have a filename starting with that P_.  OK, so now I’ll add another smart collection, this one to find all the images with filenames that contain Pano.

Lightroom CC also has a new merge to HDR feature, but that’s no big deal for me as I rarely no any sort of HDR.  However, I’m certainly open to playing around with this feature.  Face recognition is also now included, and I’m sure a lot of folks will be pleased with that.  There are also some nice additions to the slideshow module.  I’m sure I’ll discover more as I start using the program, but my initial experience is quite positive.

And one more good point:  all in all, the program runs faster than before.

I highly recommend you go to Adobe’s website and view the videos by Adobe Evangelist Julieanne Kost.  Go to https://www.adobe.com/products/photoshop-lightroom/features.html?promoid=KSKBF and click on the See how it works buttons in the Lightroom CC section.

Be sure to watch her video on some of the other new features:  https://www.youtube.com/watch?v=1GZErV1m1uQ.

HDR (a different way)

I’m not a fan of HDR images.  Well, let me clarify that statement.  I’m not a fan of the all-too-typical HDR images I see.  Over-saturated cartoonish colors, with halos around edges, and lots of noise.  No thanks.

But there is a quick and easy way to create naturalistic looking extended dynamic range images, by using Photoshop’s HDR Pro to first create a 32-bit file, and then using the adjustments in either Camera Raw or Lightroom’s Develop module to work on that file.  To be honest, I thought many photographers already knew this trick, but on a recent Van Os Photo Safari which I was leading I discovered that very few of the participants seemed aware of it.  So…OK, here goes, step-by-step.

  • Shoot a series of images varying the exposure by one or two stops between shots, just as you would for any HDR composite.
  • In either Lightroom or Camera Raw make whatever basic adjustments are necessary.
  • Select all the images, and open all in HDR Pro.  From Lightroom: Photo > Edit In > Merge to HDR Pro in Photoshop.  From Bridge: Tools > Photoshop > Merge to HDR Pro.
  • In HDR Pro, check Remove ghosts, and select 32 Bit as the Mode.

  • And now you have a choice to make.  If you normally work in Camera Raw, check the box to Complete Toning in Adobe Camera Raw.  If you normally work in Lightroom, just click OK at the bottom of HDR Pro, and then save the file as a TIFF.  Make sure you save it as a 32-bit file.

  • If you’re going the Lightroom route, import this new file into Lightroom, and then open it in the Develop module.
  •  With either method,  process the file in Camera Raw or Lightroom as you normally do… but check out the range of the Exposure slider.  It’s now plus or minus 10 stops either way, double what it was before.  Wow!  That’s a 20 stop exposure range, definitely an extended dynamic range.