Category Archives: Location

Superbloom

As was well reported, southern California experienced a “superbloom” this year.  I drove down from my home in Oregon and spent just over a week photographing at two locations relatively close together: the Carizzo Plain National Monument, and a site just north of the California Poppy Reserve.  And yes indeed, the flowers were a spectacular sight.  I wanted to work locations that were not overrun with “petal peepers” (as one of the news reports named the thousands who visited certain spots) and my choices worked out well.  Neither location offered nearby motels, but having a truck camper let me stay on-site and be out both early and late.

The biggest problem I had was weather.  More specifically, windy conditions.  This was especially true at my poppy site.  The fact that a wind farm is located right next to the Reserve was certainly an indicator of what to expect.  Focus stacking for depth of field was impossible due to the wind, but having tilt/shift lenses saved me.  Using the tilt feature I could reposition the plane of focus on the flowers for near-to-far focus while still working at an optimum aperture and a low ISO.  Tilts to the rescue!

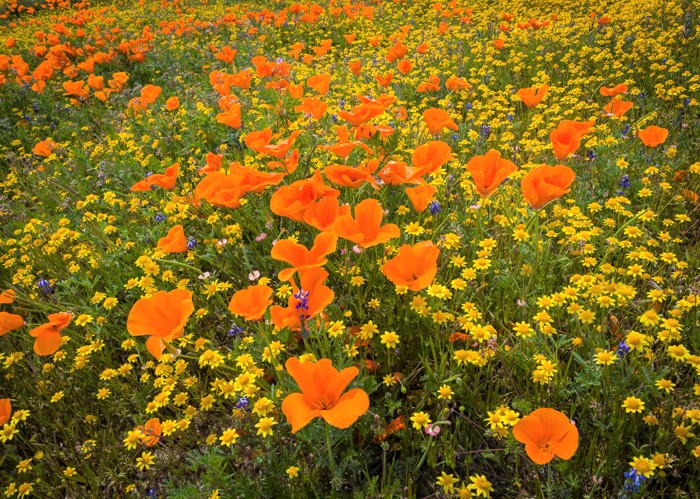
Here’s a shot from my poppy site, taken with the Nikon 24mm T/S lens.


SPOONBILLS

So what else have I been photographing this year?  In March I made a trip to Florida to work on select bird species.  I had not been to Florida since 2006, when I was using a Nikon D2x.  Spoonbills were one of the subjects I wanted.  I got to spend five shooting days at a nesting colony.  Here’s just a taste of the results, all taken with my Nikon D5 and Nikon 600mm lens.

Summer/Winter

It’s been a hot summer where I live in Oregon.  Too hot as far as I’m concerned.  I’m not a fan of really warm weather, much preferring the “fleece pullover needed” sort of days.  When I read a recent email calling me to task for not posting any images for quite a while…well, I looked back at what I’ve done photographically so far this year.  Perhaps looking at some winter photos will help me cool off.

In late January I made a trip to Bryce Canyon National Park, specifically hoping to time my trip with a snow storm predicted for the higher elevations in southern Utah.  I was hoping to get images of fresh white snow on the red Bryce formations, well knowing that such conditions wouldn’t last long.  I got lucky and made it to Bryce just as the snow was about to hit, and photographed at Bryce for the next six days.  Opening my Lightroom catalog and reviewing images taken on that trip certainly makes me feel better (it’s in the upper 90s here today!).

Of course I took a lot of overviews of the Bryce amphitheater, but I was drawn to the trees clinging to the canyon rim.


A winter morning at Bryce Canyon.


Tree on Bryce Canyon rim


Tree on Bryce Canyon rim


Tree on Bryce Canyon rim

TRIPOD SNOWSHOES

A few days from now I’ll be at Crater Lake National Park for some winter landscape work.  Crater Lake is a reasonably short drive for me, so I can easily coordinate the timing of my trip with the weather.  I want fresh snowfall and no wind.  One thing is sure: as usual for this time of year there is already a lot of snow on the ground.  A quick online check tells me that as of today there is 72 inches of snow at the headquarters building and a lot more at higher elevations.  I’ll need my snowshoes so I don’t disappear into the drifts, but what about my tripod?  How do I keep it from sinking into the snow?

While you can purchase readymade tripod snowshoes, it’s quite easy to make your own set for just a few dollars.  I did this years ago, and the first ones I made still work just fine.  Head to your local home improvement store and purchase the following:

  • Three slip-on furniture-leg tips (also known as crutch tips) in a size just large enough to slip snugly over your tripod feet.
  • Three one-inch long bolts, the nuts for them, and six flat washers that fit the bolts.
  • Three flat plastic test caps (look in the plastic pipe section).  Mine are for 4-inch pipe and cost around $1 each.

Drill a hole through the center of each leg tip, and through the middle of each plastic test cap.  Take a bolt, add a washer, and thread it through the hole in the test cap, then add a second washer and nut and tighten.  That’s all there is to it.  Make three of these, shove them over the tripod feet, and you’re good to go.  Just as you will sink a little into the snow when you’re wearing snowshoes, your tripod will also, but it won’t sink out of sight in powder snow as it would otherwise.  In deep snow start with the tripod legs less than fully spread.  As you push the tripod down into the snow, the snow itself will force the legs apart.

A well-used tripod snowshoe.

ICELAND IN WINTER

The past 17 days I’ve been in Iceland, leading a winter tour for Joseph Van Os Photo Safaris.  My group encountered wild weather, everything from a snow storm to high winds to driving rain to clear skies and bright sunshine…and all on the same day.

For me, there were two photographic highlights.  We worked several hours in a glacial ice cave in Vatnajokull National Park, and the resulting images are pure graphic design.  And toward the end of the trip we were lucky to enjoy a spectacular aurora borealis which lasted for hours.  I’ve seen the aurora many times before, but this one was an incredibly awesome display, with extremely intense colors filling the entire night sky.

Below are my two favorite shots from the trip.  Both were taken with a Nikon D810.  I used my 24-70mm for the ice cave image (at ISO 64), and my 14-24mm for the aurora (at ISO 2500).  FYI, I’ll be leading this tour again in March 2016 and an ice cave shoot is definitely on the schedule.  While an auroral display cannot be guaranteed, we will certainly be out photographing if it happens.  For tour info, see www.photosafaris.com.


Ice cave, Vatnajokull National Park.


Aurora borealis display.


This is not right.

This is definitely not the manner in which I normally photograph.

A couple of weeks ago, while I was having breakfast at a small hotel in northern Japan, a Hokkaido squirrel (Japanese tassel-eared squirrel) was raiding the bird feeders on the porch just outside the windows.  So how could I resist?  I went to my room, mounted my Nikon 80-400mm lens on my Nikon D4s, and returned to breakfast.  Between sips of my morning coffee, I photographed right though the window glass, handholding my camera rig.  Early morning light and ISO 3200; I stayed toasty warm inside. while outside it was very cold and snowy.  A bite of breakfast for me, a bite of breakfast for the squirrel, another photo or two.  This photography gig is supposed to be a lot more difficult.


Hokkaido squirrel.

Frost fog

A couple of weeks ago I was in White Sands National Monument, when a rather rare event occurred for that area of New Mexico.  It had rained for two days, so there was a lot of moisture in the sand.  But the first morning the weather cleared the photography conditions were magical for a few hours.  The overnight temperature had been in the low 20s and frost had formed on everything, while during the early hours a thick fog layer formed, low to the ground.  Wow!  Frost and fog together, a combination that lasted for only a few hours.

Autumn 2: Visionary Wild Workshop

Continued from the previous post:  Then I drove on, to the workshop sessions based at Boulder, Utah, in the Grand Staircase – Escalante National Monument.  While the aspens on Boulder Mountain were shedding their leaves, the cottonwoods in the lower canyons showed prime color.  And red rock county…well, it’s eye candy for photographers.  All the workshop participants came away with incredible images resulting from a contemplative approach to classic Utah scenery.  Here’s another slideshow, and an invitation to join the Visionary Wild group on another workshop.

Hoodoo along the Escalante rim, at sunrise.Cottonwoods in The Gulch.Hoodoos at first light.Drying mud curls.Autumn cottonwoods define the Boulder Creek drainage.The last aspen color on Boulder Mountain.Box elder in Long Canyon slot.Formation on King Bench at sunrise.A canyon wall reflects the blue color of sky.Cottonwoods and the red wall of The Gulch.Slabs below King Bench.Red aspens on Boulder Mountain.Bounce light on sagebrush and rocks, in Long Canyon.

Autumn 1: Colorado

October was a busy month.  On the way to conducting two Visionary Wild workshops with Jack Dykinga and Justin Black, I spent a few days working autumn aspens near Ridgway, Colorado.  Plagued with bad weather and vehicle problems (after being far off paved roads, by pure luck I happened to be almost in front of the only repair place in Ouray when my truck’s fuel pump decided to quit) I still managed to get some images.  And I will say: I am really happy with the new D810.  Here’s a short slideshow.

Aspens and the Sneffels Range.Aspen grove on Sunshine Mesa.Aspen boles.Aspen grove glowing after rain.The view from Silver Jack.Aspens along Owl Creek Pass.Late afternoon storm near Ridgway.

Hummers

I couldn’t resist.  Earlier this year, while on my way to the Galapagos, I stayed over in mainland Ecuador for a few days to photograph hummingbirds.  Hummers have been worked a lot, but they are magnificent little birds, and, since I was in a location with many species, why not spend a few days photographing?  As I said, I couldn’t resist.  Here’s a short slideshow.

Buff-tailed coronet hummingbirds.Booted racket-tail hummingbirdPurple-throated woodstar hummingbird.Fawn-breasted brilliant hummingbird.Green violetear hummingbird.Rufous-tailed hummingbird.Violet-tailed sylph hummingbird.Buff-tailed coronet hummingbird.Rufous-tailed hummingbird.Rufous-tailed hummingbird.Buff-tailed coronet hummingbird.

For hummingbirds on perches:  Nikon D800E in 1.2 crop mode, 500mm lens with an extension tube (for closer minimum focus), plus a bracket-mounted flash with Better Beamer flash extender attached, flash output between -1 and -2 fill.  Matrix metering, aperture priority (so shutter speeds were between 1/60 and 1/250 sec.), ISO 1000 (low light where I was photographing), f/11.

For hummingbirds in flight:  Nikon D4 with 80-400mm lens, manual exposure, ISO 400, 1/250 sec. at f/11.  In order to freeze the wing movement, I needed to light the entire scene (no fill flash here) using very short flash durations.  This is actually easy to get: set a regular flash on manual output at about 1/16 power and position the flash relatively close to the subject.  I used four flashes: one on-camera (set at an even lower power output), two on light stands aimed from either side toward where the birds would fly into a feeder, and one on another light stand and aimed at an artificial background (a print of out-of-focus vegetation).  To determine flash position, and consequently the f/stop to use, take a shot and take a look at the camera’s LCD.  The on-camera flash triggered all the other flash units; in other words, the flashes were simple slave units.  Since I was the only person working the area my flashes did not interfere with any other setup, otherwise I might have needed radio flash triggers which I don’t own.

I might note that most Nikon flashes can be set in an SU-4 mode, which allows them to act as basic optical slaves with any brand of camera.  Slave flashes certainly don’t need to be current models.  I have a Nikon SB-80DX (discontinued 10 years ago) which I picked up brand new in the box about a year ago for $25.