Category Archives: Photoshop

A QUICK PHOTOSHOP TIP

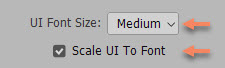
Get a high res monitor recently?  A friend of mine did, and called me complaining about how small the icons and fonts appeared when he went to use Photoshop.  He had overlooked a feature introduced back in Photoshop CC 2019.  In previous versions of Photoshop if you did Edit > Preferences > Interface you had the option to select the user interface font size.  What was added in CC 2019, and is still often not noticed, is the option to scale the UI to the font size.  Make the font larger, and the user interface and icons also get larger.

Note that you have to restart Photoshop to make the change take effect.

2020 LIST

A “to do” list to start off the new year…

  •  Backup all your files.  And back them up again, storing at least one copy in a secure off-site location.
  •  Purchase at least two USB powered hard drives for travel backup (larger capacity that what you might already have, since file sizes are increasing while drive costs are going down).
  •  Check the clock setting in your camera.  Especially important if you use the date when renaming files on import, as I do.  Are the time zone and daylight savings on/off correct?
  •  Go through all the other menu settings in your camera.  One person on my last photo tour discovered he had not reset back to RAW after doing some family snaps at jpeg/small.  Ouch.
  •  If your camera has a “my menu” feature, set it up and use it.  These are just bookmarks so you don’t have to search for settings you often change.
  •  Clean all your camera gear, both bodies and lenses.  Vacuum out bags and backpacks — you might be amazed how much dust and grit is inside your bag (and in my case, hair from our extremely furry Pomeranian!).
  •  Clean your tripod.  Grease the leg lock threads.  If you use a ball head, spray some WD40 on a rag and hold it against the ball while rotating.  Clean out the groves in Arca Swiss clamps and plates.
  •  If you use Photoshop, check the Color Settings.  For some unknown reason I’ve seen Photoshop updates occasionally change the working color space to a default of sRGB.  I know this has happened with both Windows and Mac machines.
  •  Learn at least one new Lightroom or Photoshop technique.  A personal recommendation:  get Greg Benz’s Lumenzia for luminosity selection and masking, https://gregbenzphotography.com/lumenzia/.  
  •  Make two “equipment repair” kits, one for your car and one for travel.  Hex keys, jeweler’s screwdrivers, perhaps an extra tripod foot, some gaffer’s tape, etc.
  •  If you plan on traveling out of the country, check the expiration date on your passport.  And, for that matter, your driver’s license also.
  •  And I’ll mention it again, backup your files.

PHOTOSHOP CUSTOM MENUS

I was recently doing a Lightroom/Photoshop processing demo and got asked about the appearance of the menus in my version of Photoshop.  How come some of the menu choices shown on my laptop were highlighted with different colors?  And how come the menus on the attendees’ computers had more choices than I had?  The answer was simple:  I had customized the menu choices for my particular needs.

Photoshop has seemingly a million options in each of its menus, but having so many choices can easily become overwhelming and daunting.  Just how many of these choices do you actually use?  I bet there are a lot of options that you never use, especially since Photoshop was not designed specifically for us photographers.  Why not hide the items you don’t need, and highlight the select ones you use the most?  You can easily do this by using the custom menu editor.  How do you access this special option?  Sure enough, it’s one of those many (but often overlooked) menu items.  In Photoshop click on Edit and look down at the bottom of the drop down list.

Click on Menus to open the custom menu editor, and make sure it is set for Application Menus.  Click the triangle in front of File, Edit, Image, Layer, etc., and you will see all the menu items under that particular header.  Click on the color option to add or change the highlight color for each item.  Click on the eyeball, the visibility icon, to show or hide each item.


Note the second line at the bottom:  “Show All Menu Items” will be appended to the bottom of a menu that contains hidden items.”  Those hidden items are, of course, the very ones you turned off by clicking the eyeball icon.

When you’re done, click save or save as.

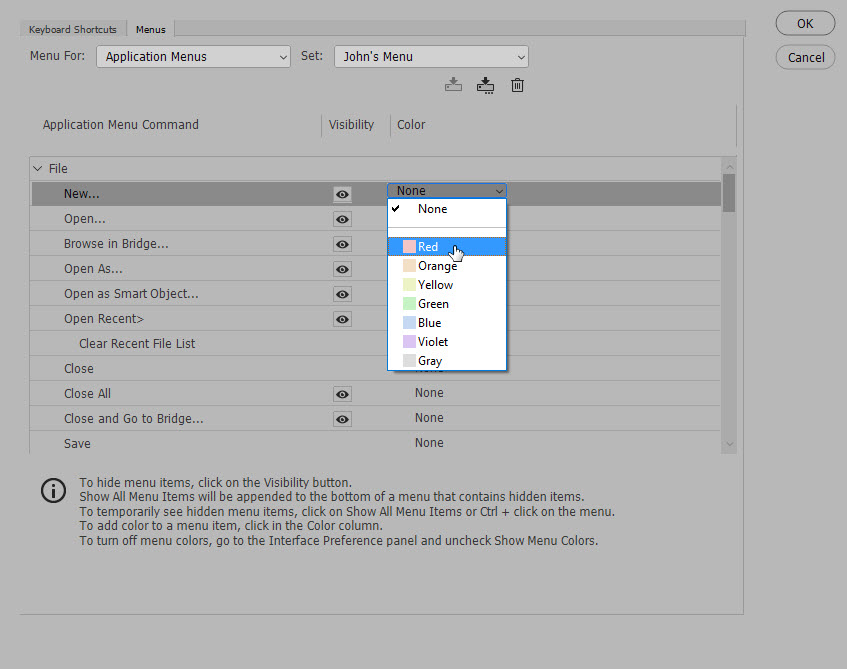
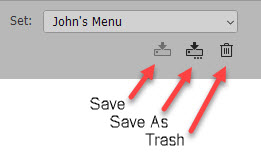
You can see that I saved my choices as “John’s Menu.”  You can switch back to the original Photoshop version at any time by selecting “Photoshop Defaults” in the “Set” drop down.  You can make as many custom menus as you want, although I don’t know why one would do this.  To delete a custom menu, select it in “Set” and then click the trash icon.

Nikon D850 Focus Shift

I’ve been using the Nikon D850 since October and can say I’m very impressed with the camera, particularly for my landscape work.  Two features in particular stand out:

  1. The “silent shutter” mode in Live View.  I should mention that I use Live View a lot when I’m photographing static subjects, and it’s a given that I’m working from a sturdy tripod.  In “silent shutter” the shutter is fully electronic — hence no shutter curtain movement at all — and of course when in Live View the mirror is up.  Eliminating the mechanical shutter and eliminating any mirror movement means eliminating two sources of possible vibration.  Turn on “silent live view photography” in the Photo Shooting menu, and select Mode 1 which gives a full-resolution, non-cropped image.
  2. The “focus shift shooting” option, also found in the Photo Shooting menu.  Here the camera takes a series of shots, slightly changing the focus point for each frame.  The resulting images can be “stacked” as a composite, thus increasing the in-focus area of the final photo.  This “stacking” must be accomplished with software in post-production; it’s not done by the camera.  The individual photos can be taken at a lens’s sharpest aperture, around f/5.6 or f/8, eliminating diffraction problems while yielding greater depth of field.

Turning on “focus shift shooting” gives you a number of choices:

  • The number of shots (up to 300)
  • The focus step width (1 through 10, undefined what these actually mean)
  • The interval until the next shot (between 0 and 30 seconds)
  • Exposure smoothing
  • Silent photography
  • Starting storage folder

Here are my choices, for landscape work:

  • Number of shots:  Set this to around 50, as the number really doesn’t matter.  The camera will stop with the lens focusing ring hits the end of its travel.  I have my camera set at 50 and most of the time the actual number of usable frames is between 5 and 10.  FYI, you will often find some extra frames where the camera has gone before the far point in your composition, so nothing is in sharp focus.  No big deal, just delete these frames when you see them later on your computer.
  • Focus step width:  I have mine set at 2, as I want to work at those prime apertures on my lenses, so I want to make sure each frame’s depth of field overlaps with that of the preceding or following frame.
  • The interval until the next shot:  I have this at 0.  And VR is “off” on the lens in use.
  • Exposure smoothing:  Off, as I do all my focus stacks in manual exposure so that all the frames already match in total exposure.
  • Silent photography:  On.
  • Starting storage folder:  I don’t use this.

So here is the easiest way I know to work.  Leave “silent shutter in Live View” turned on.  Add “focus shift shooting” to My Menu, and position it as the top most listing.  In the Custom Settings menu, Custom Control Assignment (choice number F1 in Custom Settings), set the Fn2 button on the camera rear to “access the top item in My Menu.”

In the field, turn on Live View, compose your image, set the exposure, and focus on the nearest past of the frame.  Press Fn2, select Start, and the camera begins shooting in silent mode.  When you’ve done this once, if you don’t need to change any options, the next time you can just press Fn2 and then OK twice.

Just to cover yourself, shoot several stacks of any one composition.  How to tell where each stack beings?  Wave your fingers in front of the lens and shoot one frame in Live View before you push Fn2.  Important reminder (and I speak from experience here):  remember to refocus on the closest point for each stack.

OK, now to the actual stacking.   I’m assuming you’re shooting RAW files, and you are, right?  You could use Photoshop.  If so, you need to first process the individual images and then open them as layers in Photoshop.  Select all the layers and do Edit > Auto align followed by Edit > Auto blend.  This method works OK, but there are two problems:  the final file is no longer a RAW file, and with complex subjects you will probably discover a number of stacking artifacts (blurry areas, that is).

In my opinion, a better choice is to use a separate stacking program and I would recommend Helicon Focus.  Google for a discount code to knock the price down about 20%.  Helicon works directly from Lightroom, and if you install Adobe’s free DNG Converter, Helicon has a mode called Raw In – DNG Out.  You export the selected images from Lightroom to Helicon in their original RAW state.  I’ve found that almost all the time running Helicon at its default settings works fine.  Most of the time Helicon’s rendering intent mode B is my choice.  If it leaves artifacts I try mode C.  When Helicon finishes, the resulting file can be saved right back into Lightroom as a DNG, and processed to taste as you would any RAW file.

NIK

In case you missed this, it’s now official.  The Nik suite of plug-ins will not be developed in the future.  From the banner at the top of the Nik website:

“We have no plans to update the Collection of add new features over time.”

The collection is still free to download and use, but the real question is about compatibility in the future, with either Photoshop/Lightroom upgrades or changes in Windows and Mac core OS versions.

HDR (a different way)

I’m not a fan of HDR images.  Well, let me clarify that statement.  I’m not a fan of the all-too-typical HDR images I see.  Over-saturated cartoonish colors, with halos around edges, and lots of noise.  No thanks.

But there is a quick and easy way to create naturalistic looking extended dynamic range images, by using Photoshop’s HDR Pro to first create a 32-bit file, and then using the adjustments in either Camera Raw or Lightroom’s Develop module to work on that file.  To be honest, I thought many photographers already knew this trick, but on a recent Van Os Photo Safari which I was leading I discovered that very few of the participants seemed aware of it.  So…OK, here goes, step-by-step.

  • Shoot a series of images varying the exposure by one or two stops between shots, just as you would for any HDR composite.
  • In either Lightroom or Camera Raw make whatever basic adjustments are necessary.
  • Select all the images, and open all in HDR Pro.  From Lightroom: Photo > Edit In > Merge to HDR Pro in Photoshop.  From Bridge: Tools > Photoshop > Merge to HDR Pro.
  • In HDR Pro, check Remove ghosts, and select 32 Bit as the Mode.

  • And now you have a choice to make.  If you normally work in Camera Raw, check the box to Complete Toning in Adobe Camera Raw.  If you normally work in Lightroom, just click OK at the bottom of HDR Pro, and then save the file as a TIFF.  Make sure you save it as a 32-bit file.

  • If you’re going the Lightroom route, import this new file into Lightroom, and then open it in the Develop module.
  •  With either method,  process the file in Camera Raw or Lightroom as you normally do… but check out the range of the Exposure slider.  It’s now plus or minus 10 stops either way, double what it was before.  Wow!  That’s a 20 stop exposure range, definitely an extended dynamic range.

10 Photoshop Tips

1.  To tone down the whites in an image, select them using Color Range.  Add any adjustment layer, and change the layer blending mode to either Multiply or the slightly stronger Linear Burn.  Then drop the layer opacity to taste.

2.  When shooting frames for a panoramic, manually setting camera exposure is more precise than using an autoexposure mode.  Use the middle of the panoramic scene to set the base exposure.  If you’re shooting RAW files, you can leave white balance (WB) set to Auto.  When processing the files in Adobe Camera Raw, or Lightroom’s Develop module, select one image and drag the WB slider from the “as shot” position to a distinct number.  Now sync all the other frames to that WB.

3.  Make a preset to rename your files in Bridge or Lightroom based upon the capture date.  When you travel, reset the clock in your camera to the local time zone.  This way, all your image captures will match up with your itinerary and there will be no confusion as to location.  Just remember to reset the clock when you get home.

4.  Photoshop’s Ctrl/Command+Z undoes the last step you’ve taken.  But using it immediately a second time simply undoes the undo you just made.  To step backward more than once, use Alt/Option+Ctrl/Command+Z.

5.  When preparing an image for printing, as the final step add a 3 pixel black hairline around the perimeter to define the edge.  Three easy ways to do this:

  • Select the entire image, Ctrl/Command+A.  Then do Edit > Stroke, and set pixels to 3, the color to black, and the location to Inside.
  • With the image layer unlocked, add a Layer Style, Layer > Layer Style > Stroke (or click on the fx icon at the bottom of the Layers Palette).  Set pixels to 3, Position to Inside, and color to black.
  • Increase the canvas size, Image > Canvas Size.  Select pixels for the unit of measurement, 3 for the number of pixels, black for the color, check the Relative box, and make sure the middle square is the anchor position

6.  Opening several similar images as layers in Photoshop (from either Bridge or Lightroom) aligns the outer dimensions of the images.  To align the contents, select all the layers, and then do Edit > Auto-Align Layers.

7.  Make a brush to add your name and copyright to images.  Make a new white document no larger than 2500 pixels long dimension.  Add the copyright symbol and your name.  Then do Edit > Define Brush Preset.  For a signature brush, write your name on white paper using a black marker, photograph it (jpeg, small, fine), and size the image to no larger than 2500 pixels.  Using Image > Adjustments > Levels clip the image to pure white and pure black.  Save as a brush, Edit > Define Brush Preset.  If you use either of these brushes on a new layer, you can add Layer Styles (drop shadow, etc.) to that layer.

8.  Caps Lock toggles the cursor display — for example, from standard to precise.

9.  Use the often overlooked Image Processor (from Bridge: Tools > Photoshop > Image Processor) to quickly create new file types.  Select the images, choose an output location, select the file type you want, specify the quality and size, and click Run.

10.  When making selections, remember that the “marching ants” only show pixels that are at least 50% selected.  Outside of the “ants” are pixels that are also selected, just at a lesser amount.


These tips originally appeared as part of an article I wrote for Photoshop World magazine.

Lightroom & Camera Raw

I recently received an email with a question about processing an image in Lightroom.  When the same image was opened from Bridge into Camera Raw, none of the Lightroom work was applied.  This question has come up before, and there seems to be quite a bit of confusion over what is happening.

Any time you make a change to an image in Lightroom, that information is saved only in Lightroom’s catalog.  It’s not part of the file.  The solution is simple:  after working on a photo in Lightroom, save the final metatdata settings to file (and all edits in Lightroom are metadata edits).  Select the photo or photos you have worked on, and do Ctrl/Command + S.  You can now open an image from Bridge into Camera Raw or Photoshop, and they can see what you’ve done in Lightroom.

You could select Automatically write changes into XMP in Lightroom’s Catalog Settings, but I suggest not to do so, as this has to record every edit you make.  Move any slider from 0 to 1, and then move it to 2, then back to 1, and finally back to 0, and all four of these moves have to be recorded…but in terms of the image nothing at all has happened.  Ctrl/Command +S (menu item: Save metadata to file) saves the summation, which is the only thing that matters.

Suppose you work on an image in Lightroom, and then choose “edit in Photoshop” to finalize the image.  When you’re finished working in Photoshop you select either “save” or “save as,” and the image is returned into Lightroom’s catalog and all is happy.  Lightroom knows what you have done in Photoshop.

But what happens when you do not start from Lightroom?  Use Bridge to open an image that is already in Lightroom’s catalog, make some edits in either Camera Raw or Photoshop, and then save the image…but now Lightroom doesn’t know what you have done.  When you next open Lightroom, the image will be tagged with a small badge, indicating that settings have been changed outside of Lightroom.

Click on the badge, and this message box appears:

So, what do you want to do?   If you want Lightoom to show what you did in Camera Raw or Photoshop, click on Import Setting from Disk.  If you want to to keep the Lightroom settings as they were, click Overwrite Settings.