Category Archives: Commentary

BEFORE THERE WERE DRONES….

That’s me at Michigan’s Jordan River in autumn 1975.  And yes, I carried that ladder out into the river in order to get the photo angle I wanted.  I’m using a homemade “centerpost extension” to gain height, with a bungee cord stretched along the side to dampen vibration.  A Nikon F2 is mounted on the tripod (lens unknown, but a gel filter holder is on the lens) and I’ve got a Nikkormat on a neckstrap.  This was taken on Kodachrome 25, just introduced the previous year replacing Kodachrome II.  ISO (ASA back then) of 25, hence the name.  K25 was my standard film until Fuji Velvia came on the market in 1990.  While I have this image I can’t find any of the ones I must have taken that day, which might be a comment on the resulting quality.  Interesting what you find while “sheltering in place.”

2020 LIST

A “to do” list to start off the new year…

  •  Backup all your files.  And back them up again, storing at least one copy in a secure off-site location.
  •  Purchase at least two USB powered hard drives for travel backup (larger capacity that what you might already have, since file sizes are increasing while drive costs are going down).
  •  Check the clock setting in your camera.  Especially important if you use the date when renaming files on import, as I do.  Are the time zone and daylight savings on/off correct?
  •  Go through all the other menu settings in your camera.  One person on my last photo tour discovered he had not reset back to RAW after doing some family snaps at jpeg/small.  Ouch.
  •  If your camera has a “my menu” feature, set it up and use it.  These are just bookmarks so you don’t have to search for settings you often change.
  •  Clean all your camera gear, both bodies and lenses.  Vacuum out bags and backpacks — you might be amazed how much dust and grit is inside your bag (and in my case, hair from our extremely furry Pomeranian!).
  •  Clean your tripod.  Grease the leg lock threads.  If you use a ball head, spray some WD40 on a rag and hold it against the ball while rotating.  Clean out the groves in Arca Swiss clamps and plates.
  •  If you use Photoshop, check the Color Settings.  For some unknown reason I’ve seen Photoshop updates occasionally change the working color space to a default of sRGB.  I know this has happened with both Windows and Mac machines.
  •  Learn at least one new Lightroom or Photoshop technique.  A personal recommendation:  get Greg Benz’s Lumenzia for luminosity selection and masking, https://gregbenzphotography.com/lumenzia/.  
  •  Make two “equipment repair” kits, one for your car and one for travel.  Hex keys, jeweler’s screwdrivers, perhaps an extra tripod foot, some gaffer’s tape, etc.
  •  If you plan on traveling out of the country, check the expiration date on your passport.  And, for that matter, your driver’s license also.
  •  And I’ll mention it again, backup your files.

NIKON D850 LENS PROFILE PROBLEM?

Recently I was doing some night sky photos using my D850 and the Nikon 20mm f/1.8.  When I looked at the shots in Lightroom I noticed something odd: in the darker areas, especially toward the corners of the frame, a series of faint concentric rings were visible, apparently emanating from the center of the image.  I did not have any sort of filter on the lens, so this could not be some sort of interference pattern.  What was happening?

I started doing a lot of testing.  I finally discovered that these “rings” would disappear if I unchecked the “lens profile correction” in the Lens Corrections tab in Lightroom’s Develop module.

Was this a bad lens profile or what?  I considered some options:

  • I first noticed this while working on my laptop which has a high resolution 4K screen.  Was this just a monitor artifact?  I opened the same files on my desktop computer which has a much larger, but slightly lower res monitor.  Nope, the circles were still there when “lens correction profile” was on.
  • Was this only a factor of high ISO in dim light?  I needed some control shots, done in dim light.  With my camera firmly mounted on a tripod I snapped a series of images inside my garage with the garage door closed and the overhead lights turned off.  I kept the lens at f/2 and went from ISO 100 to ISO 12800 in one stop intervals, with shutter speeds from 30 seconds up to 1/4 second.  The rings were still visible in all the images when I turned on the “correction profile.”
  • What about shooting in more “normal” lighting conditions?  I went outside and shot a series looking down my street, at different exposure values and different ISOs.  I could not see any problem in the images when the profile was on or off.
  • What about aperture settings in dim light?  Back to the garage and another series of frames, this time done at ISO 6400 and apertures from f/2 to f/11.  No change, turn the profile on and the rings were still there in all the shots.
  • What this a problem with the 20mm?  What about other wide angle lenses?  More shots in the garage, this time with my Nikon 14-24mm.  As soon as the lens profile was applied in Lightroom I could see the rings, although fainter.  I also tested the only other wide angle lens I own, the Nikon 16-35mm, and the rings were back.  Again, if I unchecked “lens profile correction” the rings disappeared.
  • What about the lack of an anti-aliasing filter on a high-res body?  I no longer own a D800E or a D810.  I didn’t own the 20mm f/1.8 back when I had those cameras, but I did have night sky shots taken with the 14-24mm.  I pulled those up, looked at them carefully, and flipped the profile correction on and off.  No rings no matter if the correction was on or off.

What on earth was going on here?  Was this a problem specific to the D850?

Now totally frustrated, I looked at my Develop settings in Lightroom.  If sure would be great to be able to use those lens profile corrections to solve the distortion and vignetting problems that all wide angle lenses have.  I discovered that if I set the sharpening Amount slider to zero the rings disappeared, but in my normal RAW file workflow I generally do want to apply some sharpening.  Back at the Lens Profile tab, I left the “profile correction” on, but pulled the sliders for Distortion and Vignetting at the bottom of that tab to zero, effectively negating the profile.  Sure enough, the rings disappeared.  But wait…how about separating those two sliders, adjusting one but not the other?  The culprit seemed to be the Distortion slider.  I could have the Vignetting slider all the way to the right, as high as possible, but the moment I moved the Distortion slider from the zero position the rings started to show.

As I stated earlier, I’ve only seen this in very low light shots, and haven’t tried any tests with longer focal lengths.  Has anyone else shooting with a D850 seen similar results?  Right now I’m thinking that when I’m processing images taken with the D850 in very low light I will leave lens profile correction turned on, but pull that Distortion slider to the far left before slowly moving it to the right.

Some thoughts on the D850

So, is the Nikon D850 the only camera you need?

In my opinion the answer to this question is the same as the answer to most photographic questions:  it all depends.  I do think the D850 is a great camera.  And if I could only own one current camera, it would be my choice.  But should it be your choice?  In my opinion your decision should take in hand these questions:

  • What do you do with your photographs?  By far, most images taken are either shown on a smart phone or tablet, or posted on the Web.  At these image sizes any camera works great, witness the fact that the vast majority of all images shot today were taken with a phone.
  • Do you really need all those megapixels?  Do you make large prints?  Really?  Do you make prints at all?  Do you own the computer power to process large files (and a D850 file with a few layers in Photoshop quickly swells to over a GB).
  • Are you primarily a bird and wildlife photographer?  The D5 definitely yields better high ISO performance at ISO 6400 and up, while both the D5 and D500 offer faster frame rates.  Sure, at roughly $950 you can soup up the D850 to 9 fps, but you end up with a camera that is slightly larger, and slightly heavier, than the D5.  Are weight and size considerations for you?
  • Do you see the D850 offering you more cropping possibilities?  The D500 is basically the same pixel density as the D850 at a considerably lower price.  If you’re thinking about the D850 in order to crop heavily, perhaps the D500 makes more sense, especially when you could put the difference in price toward additional lenses, or a better tripod, or a photo trip.
  • Can you give some specific reasons why getting a D850 will improve your photography?  What will it allow you to do that you cannot do with your present equipment?
  • And of course, can you afford the purchase price of the D850, along with new cards or computer drives or other additional expenses?

OK, I guess there is one more point than comes into play, which certainly did for me when I ordered the camera.  I rationalized that at my age I deserved a treat.  I’m not so young anymore (in all honesty, I’m in the “duffer” or “geezer” or “old guy” category), I’m not a car fanatic (although I love my truck and camper), nor am I a druggie or drunkard (although I do like a single malt in the evening).  So I figured I could indulge myself.  Yep, a rationalization for sure.  But I definitely like the D850!

COMPARISON

I recently ran across a blog post where a photographer was complaining about how much “space” his Nikon D810 files consumed, and how “costly” this space was.  Really?  I’m not exactly sure what this photographer meant, but let me take a slightly tongue-in-cheek look at “space” and “cost” today, compared to the same in the film days.

I store my digital files on hard drives.  I just checked the B&H website and a 4TB Western Digital external AC powered USB3 drive is currently priced at $119.  A 4TB drive will hold roughly 90000 D810 RAW files.  Assuming that files are processed, I’ll cut that number in half as the drive’s capacity for final images.  So, 45000 images fit on a drive that is roughly 6.5 x 5.5 x 2 inches.

Back in the film days my slide storage solution involved standard office four drawer file cabinets.  Each drawer could hold about 5000 slides in archival 20-slide pages, groups of 10 pages dropped into a single hanging file folder.  So one cabinet = 20000 slides.  Let’s cram a few more pages into each drawer, and say that 45000 slides could fit into two file cabinets.

OK, two four drawer file cabinets:  $200 (about $100 each back then, quite a bit more today).

100+ hanging file folders per cabinet:  $40 or so.

45000 slides held in 20-slide pages means 2250 pages.  B&H still sells these, currently $7 for a pack of 25.  I’ll knock this down to $5, so $450 for pages.

Add in the cost of film and processing:  45000 slides @ 36 shots per roll = about 1250 rolls of film, and at a ballpark figure of $10 per roll total cost that’s an additional $12500.

Total expense:  somewhere around $13300.

Those two file cabinets take up a goodly space:  52 x 30 x 22 inches when placed adjoining.

So…$119 and 71.5 cubic inches versus $13300 and 34320 cubic inches.  And I’m not even going to mention the difference in weight between one external hard drive and two fully loaded file cabinets.

END OF AN ERA

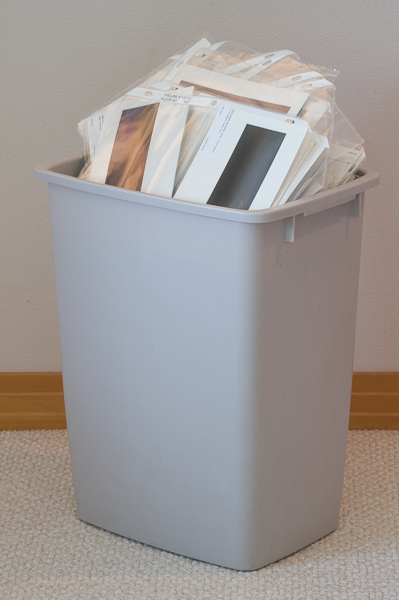
After a lot of procrastination, I’ve started sorting through about 25 years of old film images.  I haven’t shot one frame of film in over ten years now (I don’t even own a film camera anymore).  To be honest, it’s an extremely rare day when I have any reason to search for a film image…so a major housekeeping project has finally begun: I’m getting rid of as much of my film archive as possible.

I have seven four-drawer file cabinets crammed full of 35mm slides stored in 20-slide archival pages, ten pages to a hanging folder.  These are sorted into broad categories, such as birds, mammals, national parks, autumn color, etc.  I’ll be going through each section and pulling the shots I think worth keeping.  In the film days we all shot and kept duplicates of the exact same image, as multiple originals were needed to send out to magazines, books, calendars, and other possible publications.  Even having just started on this project, I’m amazed at what I kept way back when.  Yes, there are some good images, but there is also a lot of stuff that should have been ditched back at the time.  As I look through the files, I keep saying to myself “If this is what you kept, just how bad were the images you threw away?”

While the bulk of my film work was done with 35mm Nikons, I also used a Fuji 6x17cm panoramic camera for several years, and two 6x7cm medium format cameras, a Pentax 67 and a Horseman roll film view camera.  OK, there’s another whole file cabinet full of mounted images.

I’m hoping to get all this down to one file cabinet filled only with “keepers,” although that might take several passes through the files.  All the tossed film is going to a professional shredding place.

But I still have all the peripheral stuff: slide pages, labels, mounts, protective sleeves, and several large light tables.  Plus slide projectors and slide trays.  Anyone want this stuff?

Just a start: a wastebasket full of mounted 6x17cm panoramic images.

LARRY WEST

I just got back from an extended trip to learn that Larry West died on December 15.  Larry was an exceptional photographer, a great naturalist, and a good friend.  He was an enormously helpful to me at the very start of my career, and was indeed extremely generous with information, advice, and encouragement to a whole generation of nature photographers.  In the mid-1970s he and I started offering week-long photography workshops in Michigan which, to my knowledge, were about the first field workshops anywhere in the US specializing in nature photography.  After my work took me in a different direction, he continued these workshops on his own.  He also authored a series of well-received “How to Photograph” books.   Larry’s presence will be missed by many.

TECH TALK: LIGHTROOM/PHOTOSHOP

This post is going to be a bit techie.  OK, don’t say I didn’t warn you up front.

I was surfing the Web recently and ran across a blog post by a well know photographer who does not use Lightroom.  One major point made in the post was the question of why would anyone use Lightroom at all (aside from its cataloging feature) since Lightroom shows percentages for R, G, and B values,  Yes, mouse over an image in Lightroom’s Develop module and the readout is indeed in percentages.  Other RAW file converters show numerical values of 0 to 255 for each of the color channels.  Doesn’t this make using one of those converters better than working with Lightroom?

Most RAW conversion software makes you select a color space.  For example, let’s consider Adobe Camera Raw (ACR).  ACR is a separate program, accessible from Photoshop or from Bridge (which you now have to download from Adobe, rather than it being automatically included with Photoshop).  Bridge is a browser, the same as Window’s Explorer or Mac’s Finder, while Photoshop is a pixel editor.  ACR is a separate in-between software program.  When you open a RAW file in ACR, it needs a color space to use.   In simplistic terms, a color space is a group of colors out of all possible colors.  Remember when you were a kid and your parents bought you a box of crayons?  There were different boxes available, holding just 8 crayons up to 64 crayons.  Yep, more crayons, more possible colors.  No matter how you worked with the 8 crayons, you could never have the possible options and mixtures that the big 64 crayon box held.  It had a larger color space.  The basic digital color spaces are sRGB, Adobe RGB, and ProPhoto RGB.  Think of these as small, medium, and large.  Open an image in ACR, and immediately below the image window is a clickable link:

Note that the default is sRGB, the “small” color space.  Click on this link, and Workflow Options opens where you can select the color space and bit depth you want.

Whatever you select, make this your RGB working space over in Photoshop’s Color Settings (you might notice that the default in Photoshop is also sRGB).  Personally I use ProPhoto RGB in both ACR and Photoshop.

OK, so we finally get to where Lightroom differs from other converters.  You ever notice that Lightroom does not offer a choice of color spaces?  Internally it uses a variety of ProPhoto RGB.   But Lightroom differs from those other converters because it is a parametric editor.  OK, so what’s that?  In simple terms, it sums up processing instructions, which are not applied to an image until that image is either converted or exported through that instruction set into an actual editable file format.  Open an image from Lightroom into Photoshop, and it is no longer a RAW file.  A file in Photoshop can’t be saved out as a RAW file, but only in a standard graphics file format.

Well, at last we’re back to the question about those R,G, and B percentages.  Because Lightroom does not assign a color space, it cannot show numerical RGB values, since those numerical values depend on the color space in use.  Open a RAW image into some other converter besides Lightroom, mouse over the image, and read the RGB values for any one spot.  Now switch to a different color space.  The RGB readouts for that same spot will be different.  You have to specify a color space to talk about RGB numerical values.  Do I really care about this one way or the other?  No, not at all.  Photography is a visual art, not a bunch of numbers.  Use a quality calibrated monitor, look at the image, and adjust to taste.

In that same blog post I mentioned it was implied that not using Photoshop was a big mistake.  Well, I partially agree.  Photoshop does allow workflow options, such as layer masking and luminosity selections, that no RAW file converter currently allows.  But wait, this is not an either/or question.  It’s not a choice of Lightroom or Photoshop no more than it is of DPP or Photoshop, or of Nikon Capture or Photoshop.  Personally I find Lightroom’s user interface incredibly easy to use, plus I use the database feature to catalog all my image files.  But I also want Photoshop for fine-tuning images.  For me it’s a combination of Lightroom and Photoshop (and a calibrated monitor).

Scanner Part Two

I’m rather shocked that my previous scanner post has generated so many emails (42 have landed in my mailbox so far).  To answer everyone at once:

As far as I know, there are almost no dedicated 35mm film scanners currently made, but then I have no reason to keep up on the scanner market.  I’m not looking for a new scanner, and I don’t pay attention to what is out there.  I bought my Nikon Coolscan 4000 back in 2001, and it still works just fine for my purposes.  If for some reason I need a higher res digital file from a transparency, I ship the film out to have a drum scan made.  And  no, I don’ t want to sell my Nikon scanner.

I’m not in the market for different scanner software.  Yes, I know about SilverFast and VueScan, but I see no reason to purchase additional software when I’m satisfied with the results I get with NikonScan.  This is especially true since I make very few scans per year.

I’m not scanning my entire film archive, nor do I have any intention of doing so.  I only make a scan, or send out for one, when I have a very specific need (which is not nearly as often as you might expect).  Indeed, why would I even want to scan all my old transparencies?  Assume that I have 200,000 images (not such a big number, since I’ve been photographing professionally for almost 45 years now!).  Total time it takes to make one scan (pull image, remove dust, make scan, replace film, enter resulting digital file into database with caption info, etc.): about two minutes under the very best of conditions (not including any Photoshop time needed on the resulting file).  OK, 200,000 images @ 2 minutes/image = 400,000 minutes, or just over 833 days straight, working 8 hours per day with no breaks.  No thanks.

And…I actually already have thumbnail images of all my slides.  The slide itself is a thumbnail.  Hold up the slide, look at it.

New Camera…Cannot Open RAW Files

Almost every time a new Nikon camera is introduced, I receive the same email: “I just bought the newest Nikon, but I cannot open the RAW files in either Lightroom or Photoshop.  These programs worked perfectly with my old camera.  Is my new camera defective?”

This past week alone I got five such emails concerning the D750.

When you purchase any camera you should check with Adobe as to which camera bodies are currently supported, given the versions of the Adobe software you own.  Go to this web site:  http://helpx.adobe.com/creative-suite/kb/camera-raw-plug-supported-cameras.html.

The other email I constantly receive is: “I have Lightroom 3 and Photoshop CS4, but cannot open the RAW files from the new Nikon I just purchased.”

Well, your new Nikon did not even exist when those old versions of software were created.  Your options are to either upgrade the software (in my opinion the better option as newer versions of software generally offer more), or see if you can use the free Adobe DNG converter with your new camera.  Find out here:  http://helpx.adobe.com/photoshop/camera-raw.html#dng.

You might discover you need to upgrade your computer.  Another typical email I get: “I’m using Windows XP, but Lightroom 5 won’t work.”  Really?  Look at the operating system requirements for Lightroom 5:  Windows 7 with Service Pack 1 or newer.  XP is, in computer terms, ancient history.

So now I’m waiting for another email to arrive: “I use a typewriter, but I can’t seem to load Microsoft Word.”

I have no idea how to answer that.