Author Archives: John

NEW LAPTOP

A couple of months ago I realized that it was time for a new laptop computer. I don’t use a laptop when I’m in my office, where I have a serious desktop machine with attached NAS and JBOD boxes. My use of a laptop is almost exclusively when I’m on the road for photography purposes, and all too often this involves air travel. What I wanted in a new laptop was:

  • fast i7 chip
  • 1 TB SSD
  • discrete video card
  • minimum 16 GB RAM
  • three USB3 ports
  • backlit keyboard
  • best laptop screen possible
  • 15 inch display
  • HDMI connection
  • as small and light weight as possible
  • I’m a long-time Windows user, so not a Mac

I wanted to be able to run Lightroom and Photoshop at the same time, along with a basic Office setup (Word, PowerPoint, and Excel) and a few other programs (ViceVersaPro, FileZilla, and SnagIt).

I looked at various laptop websites, and finally placed an order for the new Dell XPS 15 (model # 9550) which, thanks to its “infinity edge” display, has a 15 inch screen in a 14 inch sized laptop. Ah, relatively small and light weight. Here’s a link to Dell’s website page: http://www.dell.com/us/p/xps-15-9550-laptop/pd. Dell offers the laptop with a choice of a 4K 3840 x 2160 pixels touchscreen or a non-touch 1920 x 1080 one. I ordered the high-res 4K touchscreen as it is one of the few laptop screens to cover the entire Adobe RGB space. I will admit that as soon as I received the laptop I immediately turned off the “touch” option. I don’t want fingerprints all over the screen, and I much prefer using a mouse (and I hate using a trackpad for anything). I might mention that I found the same laptop but with a lower price tag at Best Buy, and Dell honored the lower number through their Price Match offer.

I’ve been vary pleased so far, with no problems at all. It’s a Windows 10 machine, which was a new OS for me as I’ve been running Windows 7, and will continue to do so on my desktop computer as I see to reason to change something that’s performing perfectly. Adapting to Windows 10 was very easy, no big deal at all. I did download Dell’s Feature Enhancement Pack in order to keep the keyboard backlighting from timing out as quickly as it did. I calibrated the screen using an i1 Display Pro, and for you nerds out there the DeltaE was .6 which is impressively accurate.

The major concern I had was how software would appear on that 4K screen. Pixel dimensions of 3840 x 2160 means a lot of very tiny pixels in a pretty small area. Think about it: an image that is 1000 pixels on the long dimension is still going to be 1000 pixels long on a 4K display, but because the pixels themselves are smaller, the image is going to appear physically smaller on-screen.  On an old 1024 x 768 screen of the same physical size as that of my new Dell those 1000 pixels are almost all the way across the screen. On this 4K one, it’s a lot less. Web and Office pages are easy to scale; hold down Ctrl and use the scroll wheel on your mouse. There’s no problem at all with Lightroom and Photoshop if you use the CC versions, which I do, as both of these automatically scale up the user interface.

However, not all programs can be scaled up so for many photographers the non-touch screen might be a better option. Bridge is one of those programs. The print is really small. Of course you could reset the high-res screen to a lower resolution, but that defeats the purpose of getting it in the first place. Nik filters do not scale, nor do most of the Topaz ones. As a confirmed Lightroom user I almost never use Bridge, so that’s no big deal. I do occasionally use Nik Dfine (almost always at its default settings) and sometimes one particular combination of filters in Color Efex Pro (a combo of Tonal Contrast and Detail Extractor at a very low amount). I set the Nik filters to always open at my preferred choices so all I have to do it tap OK rather than try to read the tiny print. Again, if you’re a big user of Nik or Topaz, the non-touch screen might be the better choice.

I made those Nik filter settings by using the Windows Magnifier, which allows temporarily zooming around the screen image. One quick way to access the magnifier is by using  the Windows key + “+” (the Windows key along with the “plus” key). You can set the level of magnification you wish to use.  Windows key + Esc turns the Magnifier off.  Google “Windows Magnifier” for more into.

If you looked at the specs noted on the Dell page, you would have seen that the laptop has one HDMI port, two USB3 ports, and a new USB-C port which supports both USB3 and Thunderbolt 3. I carry a little HDMI to VGA adapter just in case I have to connect to an older digital projector. I also picked up a couple of USB-C to USB3 adapters.

The only weird thing I’ve discovered is that the Hoodman Steel USB3 card reader I’ve used with my previous Windows 7 laptop was not recognized when I plugged in into one of the USB3 ports. I downloaded a new driver from Hoodman, and still no luck. But when I plugged the Hoodman into the USB-C port using an adapter the card reader was immediately found. Go figure. I picked up a new Lexar card reader, and the laptop saw it immediately no matter which port I used. The laptop does have a built-in SD card reader, and in my informal test this one is very fast.

As with all new computers, I would strongly suggest looking for updates to the operating system and BIOS. As I said above, no problems so far. And yes, I think it was the right decision for what I needed.

LARRY WEST

I just got back from an extended trip to learn that Larry West died on December 15.  Larry was an exceptional photographer, a great naturalist, and a good friend.  He was an enormously helpful to me at the very start of my career, and was indeed extremely generous with information, advice, and encouragement to a whole generation of nature photographers.  In the mid-1970s he and I started offering week-long photography workshops in Michigan which, to my knowledge, were about the first field workshops anywhere in the US specializing in nature photography.  After my work took me in a different direction, he continued these workshops on his own.  He also authored a series of well-received “How to Photograph” books.   Larry’s presence will be missed by many.

AUTO ISO IN MANUAL

Many current cameras have a “hidden” autoexposure feature, an option I use quite often when working wildlife.  If your camera has “auto ISO” buried someplace in the menus, you probable can use this feature.

Three choices control exposure:  shutter speed, aperture, and ISO.  We generally lock in two of these, and vary the third.  In aperture priority you select the f/stop and ISO, and the camera sets the shutter speed.  In shutter priority you select the shutter speed and ISO, and the camera sets the f/stop.

With most cameras it’s far easier to change shutter speed and/or aperture than it is to change ISO.  After all, with both Nikon and Canon that’s what the command dials by themselves do as default behavior.

Look in your camera’s menus to see if you have “auto ISO.”  If so, turn it on for this test.  The way auto ISO normally works is that you set a minimum shutter speed and a maximum ISO value.  So long as you’re shooting at that shutter speed or higher, the camera will vary the ISO needed for the situation.  If the light level drops below this range one of two things happens: (a) in aperture priority the shutter speed continues to slow below your preferred minimum, while the highest ISO value is maintained, or (b) in shutter priority, once the aperture is wide open the camera underexposes, usually with some sort of viewfinder warning indicator, but still using the highest ISO.

But here’s the catch for bird and mammal work: setting a minimum shutter speed for wildlife means you’re probably going to choose a fast speed in order to stop any possible action.  What if you intentionally want a slower speed?  At the same time, at any given light level you don’t want to work at any higher ISO than necessary; you always want to use the lowest ISO you can get away with, given the situation.  That fast minimum shutter speed you selected may force you to shoot at a high ISO even in good light.

OK, back to those three variables that control exposure.  Reread that paragraph up above, and you’ll notice that I did not mention the manual exposure mode in which what you set is what you get.  In this exposure mode you have to manually set both the shutter speed and the f/stop.  Now here’s the kicker: if your camera has auto ISO, most likely you can use auto ISO while the camera is in manual mode, and let the camera vary the ISO needed for whatever shutter speed/aperture combination you select.

However — and this is a major “however” — you must know how to work in the manual mode.  I’m always amazed at how many photographers today do not know how to do so.  If you’re not sure, read my June 2015 blog post, and your camera’s manual, and practice.

So, switch to manual exposure mode, and turn on auto ISO.  Set the highest ISO value to whatever maximum ISO you’re comfortable using with that camera.  Set the camera itself to its lowest native ISO.  For Nikon cameras, the “minimum shutter speed” choice in auto ISO does not apply when the camera is in manual mode (and I’m pretty sure this is also true for Canons, but not being a Canon user myself…).

What you have basically done is turn the manual exposure more into an autoexposure one.  You select the f/stop and shutter speed you want, the camera sets the necessary ISO.

But how can you add or subtract the amount of light (for example, in order to reposition the histogram when shooting RAW) if the camera adjusts the ISO for any given shutter speed/aperture combination?  Just as in any autoexposure mode, you use the camera’s autoexposure compensation.  This does not affect the shutter speed or aperture you’ve set; after all, in manual mode what you set is what you get.  Instead, it changes the ISO the camera selects.  Dial in a +1 autoexposure compensation, and the camera raises the ISO by one stop; dial in a -1 compensation, and it drops the ISO by one stop.  Since the camera is in manual mode, the shutter speed and aperture displayed in the viewfinder will not change, but there will be some sort of indicator that exposure compensation is in effect.  You’ll have to pay attention to what you’re doing, and remember to return the compensation back to “zero” when no compensation is needed.  If the light level drops so low that the camera maxes out ISO, your set exposure values will be too low.  Just watch the meter display, which in this case will show underexposure.

Should you use this “auto ISO with manual” mode all the time?  Heavens, no.  As with all modes on your camera, you use what is appropriate to the situation.  I personally find auto ISO in the manual mode extremely useful when I’m working wildlife.

SMALL BOAT, BIG LENS

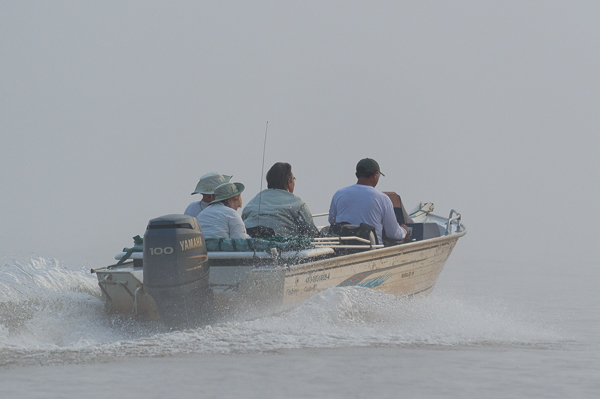
What’s the best way to use a big lens — something like a 500mm or 600mm — when photographing from a small boat?  Here’s the sort of boat I’m talking about.

Handhold that big lens?  Sure, you can get a shot or two off, but handholding a really large lens is almost impossible to do for any length of time.  The minute you relax and lower the lens is exactly the moment you should be shooting.  Set up a tripod?  A tripod is almost impossible to use, if you are in a situation where you cannot move around.  Try this experiment:  sit with your tripod mounted big lens directly in front of you at eye level, as if you were sitting in a small boat.  Now swing the lens hard right, and without changing your body position, try to look through the viewfinder.  Bet you can’t do it.  And if your tripod doesn’t have a centerpost it’s almost impossible to raise or lower the shooting height.  You’re stuck with photographing to your left side at one camera height.  Don’t even try to aim the lens at much of an up angle, unless you want to turn your body into a pretzel.

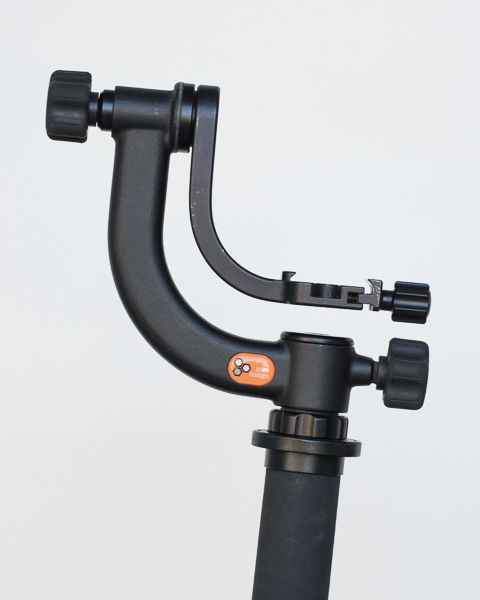
My solution may seem a bit strange at first, but it works really great.  Use a monopod with a gimbal head mounted.  My preferred setup is the Manfrotto 681B monopod (the flip-locks make it easy to lengthen or shorten the monopod using just one hand, while you support the camera/lens with the other) plus the Jobu Jr 3 Deluxe gimbal head (the smallest and lightest gimbal, ideal for travel).

I’ve used this combination a lot from small boats, and also from open sided safari vehicles, while working with my Nikon 500mm and both the “old” Nikon 600mm G and my “new” Nikon 600mm FL lens.  Balance the lens in the head as you would whenever you use a gimbal.  Lock the gimbal’s horizontal rotation, as you can just turn the monopod from side to side.  Leave both the swing arm, and the lens’s tripod collar, unlocked.  You can now easily aim the lens in any direction, side to side or up and down, and raise or lower the shooting height.  The advantage of the gimbal head over a “monopod head” is that with a gimbal the lens remains balanced even when the control knobs are loose.   Hold the monopod with one hand, and your lens doesn’t flop forward or backwards as it would with an unlocked “monopod head.”  With the gimbal mounted on a monopod you’re always ready to shoot.

Yes, I know this seems unconventional, but just try it to see if it works for you.  And by the way, I absolutely love the “new” Nikon 600mm FL lens…in my estimation the sharpest long lens I’ve ever used.

TWO LONG EXPOSURE TIPS

Just a couple of quick tips relating to long exposures….

When using an ND filter, paired with a low ISO value, it’s often difficult to get a meter reading.  A standard solution is to crank up the ISO, take a meter reading, and then count stops back to the desired ISO.  For example, suppose you want to shoot at ISO 100.  Change the ISO temporarily to 6400:  1 second @ ISO 6400 = 2 seconds @ ISO 3200 = 4 seconds @ ISO 1600 = 8 seconds @ ISO 800 = 16 seconds @ ISO 400 = 1/2 minute @ ISO 200 = 1 minute @ ISO 100.

A shortcut I’ve used for a long time is to think of this in a slightly different way.  The time in seconds at ISO 6400 is the same numerical value in minutes at ISO 100.  1 second @ ISO 6400 = 1 minute @ ISO 100.  10 seconds @ ISO 6400 = 10 minutes @ ISO 100.  1/4 second @ ISO 6400 = 1/4 minute @ ISO 100.

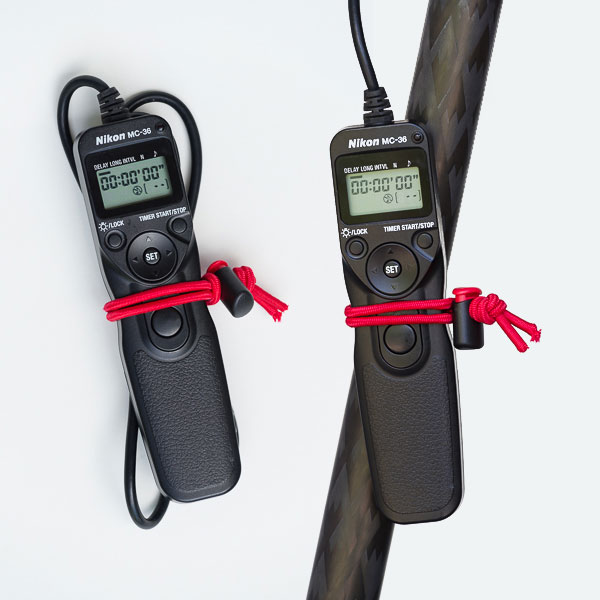
Most cameras offer 30 seconds as the longest timed shutter speed.  After that you have to use an intervalometer shutter release such as the Nikon MC-36.  These things have long cords, so how do you keep one from blowing around in any breeze while it’s dangling from your camera running a long timed exposure?  For that matter, what’s a good way to control that cord in a camera bag?  My solution is this:  http://www.thinktankphoto.com/products/redwhips.aspx, basically a thin bungee cord and a cord lock.  You can easily make these yourself, but I admit being partial to ThinkTank’s red ones (easier to find when dropped).  Here’s a composited illustration, showing the MC-36 ready to pack, and attached to a tripod leg.

Two uses for ThinkTank’s cable ties.


TECH TALK: LIGHTROOM/PHOTOSHOP

This post is going to be a bit techie.  OK, don’t say I didn’t warn you up front.

I was surfing the Web recently and ran across a blog post by a well know photographer who does not use Lightroom.  One major point made in the post was the question of why would anyone use Lightroom at all (aside from its cataloging feature) since Lightroom shows percentages for R, G, and B values,  Yes, mouse over an image in Lightroom’s Develop module and the readout is indeed in percentages.  Other RAW file converters show numerical values of 0 to 255 for each of the color channels.  Doesn’t this make using one of those converters better than working with Lightroom?

Most RAW conversion software makes you select a color space.  For example, let’s consider Adobe Camera Raw (ACR).  ACR is a separate program, accessible from Photoshop or from Bridge (which you now have to download from Adobe, rather than it being automatically included with Photoshop).  Bridge is a browser, the same as Window’s Explorer or Mac’s Finder, while Photoshop is a pixel editor.  ACR is a separate in-between software program.  When you open a RAW file in ACR, it needs a color space to use.   In simplistic terms, a color space is a group of colors out of all possible colors.  Remember when you were a kid and your parents bought you a box of crayons?  There were different boxes available, holding just 8 crayons up to 64 crayons.  Yep, more crayons, more possible colors.  No matter how you worked with the 8 crayons, you could never have the possible options and mixtures that the big 64 crayon box held.  It had a larger color space.  The basic digital color spaces are sRGB, Adobe RGB, and ProPhoto RGB.  Think of these as small, medium, and large.  Open an image in ACR, and immediately below the image window is a clickable link:

Note that the default is sRGB, the “small” color space.  Click on this link, and Workflow Options opens where you can select the color space and bit depth you want.

Whatever you select, make this your RGB working space over in Photoshop’s Color Settings (you might notice that the default in Photoshop is also sRGB).  Personally I use ProPhoto RGB in both ACR and Photoshop.

OK, so we finally get to where Lightroom differs from other converters.  You ever notice that Lightroom does not offer a choice of color spaces?  Internally it uses a variety of ProPhoto RGB.   But Lightroom differs from those other converters because it is a parametric editor.  OK, so what’s that?  In simple terms, it sums up processing instructions, which are not applied to an image until that image is either converted or exported through that instruction set into an actual editable file format.  Open an image from Lightroom into Photoshop, and it is no longer a RAW file.  A file in Photoshop can’t be saved out as a RAW file, but only in a standard graphics file format.

Well, at last we’re back to the question about those R,G, and B percentages.  Because Lightroom does not assign a color space, it cannot show numerical RGB values, since those numerical values depend on the color space in use.  Open a RAW image into some other converter besides Lightroom, mouse over the image, and read the RGB values for any one spot.  Now switch to a different color space.  The RGB readouts for that same spot will be different.  You have to specify a color space to talk about RGB numerical values.  Do I really care about this one way or the other?  No, not at all.  Photography is a visual art, not a bunch of numbers.  Use a quality calibrated monitor, look at the image, and adjust to taste.

In that same blog post I mentioned it was implied that not using Photoshop was a big mistake.  Well, I partially agree.  Photoshop does allow workflow options, such as layer masking and luminosity selections, that no RAW file converter currently allows.  But wait, this is not an either/or question.  It’s not a choice of Lightroom or Photoshop no more than it is of DPP or Photoshop, or of Nikon Capture or Photoshop.  Personally I find Lightroom’s user interface incredibly easy to use, plus I use the database feature to catalog all my image files.  But I also want Photoshop for fine-tuning images.  For me it’s a combination of Lightroom and Photoshop (and a calibrated monitor).

LIGHTROOM AND TRAVEL

How does one coordinate Lightroom used on a laptop when traveling, with a master Lightroom catalog back in the office?  I’ve written about this before (see my blog for October 2, 2012) but the topic keeps coming up at workshops and on tours, so….

I have one main master Lightroom catalog for all my images, which resides on my desktop computer in my office.  That master catalog is on an internal drive (a different drive than the internal SSD drive I use for all my programs).  A backup copy of this master catalog is made to another internal drive (automatically done by Lightroom when I exit the program), and a third copy of the catalog is on a small external USB drive.  Yes, I’m a bit paranoid about loosing all that data.

I have another Lightroom catalog named Travel on my laptop.  When I’m on the road, I download images using Lightroom, in the exact same format structure I use for the image files back in my office.  As the files are downloaded, Lightroom automatically renames the files and adds my copyright information, using templates I’ve created in Lightroom.  My naming template is a YYMMDD_camera-generated-file-name-and-number format, so individual files appear along the lines of 150624_D4S_4752.  Nikon lets you set camera names in the menu system to a three character code, so my cameras are named D4S and D8T.  Yeah, real original thinking there.  Image files are always downloaded into a  _Photos folder (the underscore makes it the topmost folder in my laptop’s directory), into a subfolder named by month and location of shoot.  06 Namibia would by a June trip to Namibia while 09 Denali would be a September shoot in Denali.  Each day’s images are automatically sorted as Lightroom reads the file metadata, makes YYYY-MM-DD folders as needed inside the month-shoot folder (the 06 Namibia or 09 Denali folders), and puts the correct images into the correct folders (I always have my cameras set to the local time, which in turn means all images will be correctly sorted by date).  Once all these parameters are checked in Lightroom they remain as set, so the only thing I ever have to change is the name of the month-shoot folder.  I flag any images I work on in Lightroom, highlight those images, and save all metadata to file by doing Ctrl/Command + S.

While on the road I copy every day’s take to two small external USB powered hard drives, so that by the end of the trip I have three duplicate copies of all my images.  Since the files are already in the organization I use in my office, all I have to do once I get home is to copy the image files to their correct location on my master hard drives, and to add the trip catalog to my master catalog.  I open the Travel catalog on my laptop, select the folder with the trip images, and do File > Export as Catalog, saving the exported catalog on one of the small USB drives.  I make sure to include the image previews.  Since the image files on the USB drive are all current with the correct metadata saved to them, there is no reason for me to do what Lightroom calls Export negative files (“negative files” is Adobe-speak for the actual images).

Back in the office I plug this drive into a USB port on my desktop computer, and use my operating system to copy the image shoot folder, which has all the photos, over to the correct date location on my main hard drive array.  Then I open my master Lightroom catalog, and do File > Import from Another Catalog, and select the catalog on the USB drive.  When this is finished working, I disconnect the small USB drive, at which time Lightroom want to know where the files are located since the imported catalog still thinks they are back on my laptop.  I point Lightroom to the correct image folder I’ve copied over, the 06 Namibia folder or whatever it is, and I’m done.  The backup software on my desktop computer automatically kicks in, and backs up my new images.

When I’m positive that all is well with my desktop system, I remove all the photos from the Travel catalog on my laptop, so that I can reuse the catalog shell again with all my preferences still set.  I reformat the USB drives, reset the time in my cameras, and I’m good-to-go on my next adventure.

USING MANUAL EXPOSURE

In my photography I use Aperture Priority metering most of the time.  I take a shot, look at the histogram, and use Exposure Compensation (EC) to add or subtract light as needed.  Yes, this works great most of the time…but most of the time does not mean all of the time.  There are shooting situations where it is best to not use an autoexposure mode (aperture priority mode, shutter priority mode, or program mode).  This means selecting both the shutter speed and the lens aperture; that is, using manual exposure mode.  In this mode, you have to physically set both the shutter speed and the aperture, and the camera remains at those settings — and exposes at those settings — no matter where you aim the camera.  What you set is what you get, period.  EC does nothing to change the camera’s settings.  It affects the meter readout, but it does not in any way change the shutter speed or aperture on the camera, so turn EC to zero.  In manual exposure mode, what you set is what you get.  If you want to lighten or darken the image, you have to physically change the shutter speed or the aperture or the ISO.  The camera itself does not change anything.  What you set is what you get.

This blog post comes about because of a Joseph Van Os Photo Safari I recently led.  We were standing on the top of a cliff overlooking the ocean, preparing to photograph birds flying past.  If they birds were above us, the background was a pale milky blue sky.  If below us, the background was a dark navy blue ocean.  So what’s the right exposure?  Any autoexposure mode would be biased by which background was in the frame.  One solution would have been to work only those birds against the pale sky, or only those against the dark ocean.  But the birds were not cooperating in that manner.  They would swoop around, at one moment be above us and the next moment be below us.  When I mentioned that this situation called for a manually set exposure, to compensate for the different background tonalities, the response I got reminded me once again how many photographers have never used a camera in the manual exposure mode.

If the light remains the same, once you correctly set a manual exposure, it is correct for all subjects in that light regardless of their tonality.  OK, but how to set that exposure?  Pick something, it doesn’t matter what, in that constant light, and adjust for it’s tonality.  When you set the camera to manual exposure, an analog display will appear in the viewfinder with a “zero” point in the middle of a “plus” and “minus” line.  “Zero” is the starting point.  Change the shutter speed and/or aperture until this mark in highlighted, and you have set the camera to render whatever you aimed it at to be rendered as a medium tone.   Go to a “plus” mark, and you have added light.  Go to a “minus” mark and you have taken away light.   So, aim the camera at a single tone, and meter it and only it.  Physically change the shutter speed and/or aperture to render that area at whatever tone you want it to appear.  Here’s a quick and dirty way to think about this.  At the “zero” mark the camera will render that subject you metered as a medium tone.  At the “plus one” mark, one stop open, the metered subject will be rendered as a “light” tonality.  At the “plus two” mark, two stops open, it will be rendered as a “very light” tonality.   At the “minus one” mark, one stop down, it would be “dark” subject; at “minus two” it would be an “very dark” subject.

Suppose you meter a blue area.  Here’s what would happen as you change the shutter speed/aperture combination:

+3, whitish blue
+2, very light blue
+1, light blue
0, medium blue
-1, dark blue
-2, very dark blue
-3, blackish blue

Back to those birds….  The solution would be to pick an easy area to meter:  either the pale sky, or the dark ocean water.  Let’s use the pale sky; it was roughly “very light blue.”   Set the camera to manual exposure mode, aim it at the area of sky where the birds would be, and adjust shutter speed/aperture until the “plus two” mark was highlighted.   It doesn’t matter what combination shutter speed/aperture you use to get started.  Pick the equivalent combination that gives the shutter speed needed or the aperture needed.  Suppose you aimed your camera at that sky and the exposure combination that yielded “plus two” was 1/125 sec. at f/11.  Well, you know that 1/125 sec. is way to slow a shutter speed to freeze a bird in flight.  1/125 sec. at f/11 is exactly the same as 1/250 sec. f/8, or 1/500 sec. at f/5.6, or 1/1000 sec. at f/4, etc.  Need a faster shutter speed?  Raise the ISO one stop, and you could shoot at 1/2000 sec. at f/4 (or any equivalent combination).  Set the shutter speed/aperture combination you want to use, and fire away.  So long as those birds remain in the same light, and the light itself does not change, the exposure will be correct no matter the background.

I can think of a number of situations where using manual exposure would be best.  Consider working a black sand beach, with waves breaking white over it.  The camera meter would read a black subject at one moment, a white subject at another.  Or imagine you’re using a zoom lens to photograph a dark buffalo standing in the snow in Yellowstone.   As you zoom the lens, the image changes from primarily snow to primarily buffalo.  Or a situation I faced back in February while photographing red-crowned cranes.  The white cranes were standing in a snow-covered field, but as they took flight the background became leafless winter trees, a dark toned area, and then to medium blue sky as the birds rose higher.  In all three situations, so long as the light remained unchanging, the solution was to meter one area, set the exposure using manual mode, and shoot away.

If you’re not familiar with the manual exposure mode, I would strongly suggest some practice.  But let me add one final statement:  with all digital cameras, you cannot evaluate exposure or color via the LCD on the back of the camera.  The histogram is your friend, whether shooting manual mode or one of the autoexposure modes.  Learn how to use manual exposure mode, and learn how to read the histograms.

CAMERA RAW 9

If you’re an Adobe Camera Raw user, rather than a Lightroom user, I might point out that the new “merge to panorama” and “merge to HDR” options are also available in Camera Raw 9 if you’re running Photoshop CC.

In Bridge, select the images you want to use, and then open those images in Camera Raw.  Once again, select all the images and then click to see the new options.

Click “save” but do not close Camera Raw, and the merged image will appear as a DNG file at the bottom of the Camera Raw filmstrip, and can be processed in ACR as you would any RAW file.

As with Lightroom, a merged HDR file in ACR will now offer plus/minus 10 stops on the exposure slider, a total of 20 stops.

LIGHTROOM CC: ADDITIONAL HDR INFO

In my last post I should have mentioned one important fact about the new “merge to HDR” feature in Lightroom.  When working on the resulting DNG file in Lightroom, the exposure slider now offers plus/minus 10 stops of exposure, a 20-stop exposure range, double the standard amount.  This is reminiscent of working with HDR Pro in Photoshop; see my August 2014 post entitled “HDR (A DIFFERENT WAY).”