When you open a RAW image in Lightroom, what you see on screen depends on the default starting points you have chosen. One option is just to accept Adobe’s default settings. Or you can make your own defaults. Remember, these default settings are not set in stone — a RAW file is just the ones and zeros used by a computer until those bits and bytes are rendered in some fashion so that the file can be seen. Default settings do not make a finished file, but just an initial rendering. How do you want an image to appear when it first opens on your monitor?
Up until this latest Lightroom update the way you set a default was to open an unprocessed RAW file in the Develop module and make the choices (move the sliders, check the boxes, etc.) that you wanted to be applied initially to files taken by a particular camera model. Then by holding down the Alt/Option key the Reset button changed into “Set Default.”
The 9.2 update changed this process, and the Alt/Option bit no longer works. If you had created your own specific defaults, these do not carry over into 9.2.
I use three different Nikon camera bodies, a D5, a D500, and a D850. I had different defaults for each of these, mainly in the amount of sharpening applied, so I needed to recreate these. It’s actually very easy.
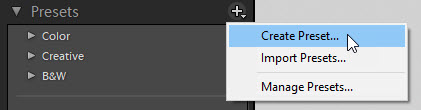
Open any file in the Develop module. Set the sliders the way you want. Go to Presets on the left side of your screen, click on the + symbol to save a new preset, and save with a unique name as a User Preset. I created presets for my three cameras saved with the obvious names of D5, D500, and D850.
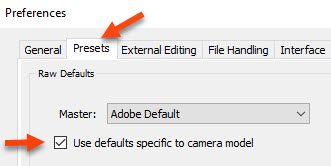
Go to the Presets tab in Lightroom’s Preferences. Check “Use defaults specific to camera model.”
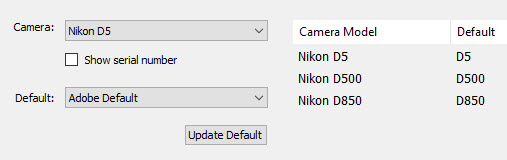
Select your camera and click the Default box immediately below. Click Preset, then select the User Preset you made for that camera.
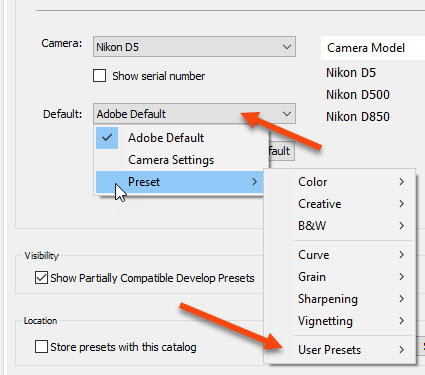 Your default preset shows up and will be automatically applied to files taken with that particular camera.