TO MY READERS…

With some sadness I’m announcing that I will no longer be adding to this blog.  The world has changed rather drastically since spring 2020, affecting all of us is so many different ways.  I will certainly continue photographing.  For now, just a quiet “thanks for reading.”

NIKON INTERVAL TIMER

Even use the interval timer feature on your Nikon?  Easy to set with normal shutter speeds, but at speeds between 15 and 30 seconds things don’t work as expected.  Part of the problem lies in Nikon’s definition of the “interval” between shots.  One might expect this to be the time between one frame and the next, the shortest option being one second.  If you wanted to shoot several 30 second frames, at one second apart, the most logical sequence would be 30 seconds exposure, one second interval, 30 seconds exposure, one second interval, etc.  Nope, it doesn’t work that way.  In Nikon-speak the “interval” is the time from the start of one frame until the start of the next, so you need to add that one second to the sequence.  30 seconds exposure, 31 seconds interval, 30 seconds exposure, 31 seconds interval, etc.  Try this, and to your surprise this timer thing still won’t work right.

The problem here is that while the marked shutter speed might say 30 seconds, it’s really slightly longer at 32 seconds.  How come?  Well, shutter speeds on a camera are in stop increments, doubles and halves (the definition of a full “stop,” twice as much or half as much).  But ever notice that the numbers don’t work out that way?  1 second, ½ second, ¼ second, 1/8, 1/15, 1/30…hey, that really should be 1/16 sec., 1/32 sec., 1/64 second, etc.  OK, no big deal going that direction.  But go the other way and count off seconds.  1 sec, 2, 4, 8, 16, 32…even though the camera says 15 and 30.  Set your camera at 15 seconds, and the minimum “interval” is 17 seconds (16 + 1).  At 30 seconds the minimum “interval” is 33 seconds (32 + 1).

To be honest I rarely use the interval timer.  When I want a sequence of long exposures I normally use a Nikon MC-36, a timer cable release, which allows me to set shutter speeds over 30 seconds along with the number of frames to be taken, with the camera on “bulb.”  Just remember that the needed “interval” is in Nikon-speak.

BEFORE THERE WERE DRONES….

That’s me at Michigan’s Jordan River in autumn 1975.  And yes, I carried that ladder out into the river in order to get the photo angle I wanted.  I’m using a homemade “centerpost extension” to gain height, with a bungee cord stretched along the side to dampen vibration.  A Nikon F2 is mounted on the tripod (lens unknown, but a gel filter holder is on the lens) and I’ve got a Nikkormat on a neckstrap.  This was taken on Kodachrome 25, just introduced the previous year replacing Kodachrome II.  ISO (ASA back then) of 25, hence the name.  K25 was my standard film until Fuji Velvia came on the market in 1990.  While I have this image I can’t find any of the ones I must have taken that day, which might be a comment on the resulting quality.  Interesting what you find while “sheltering in place.”

LIGHTROOM 9.2 RAW DEFAULTS

When you open a RAW image in Lightroom, what you see on screen depends on the default starting points you have chosen.  One option is just to accept Adobe’s default settings.  Or you can make your own defaults.  Remember, these default settings are not set in stone — a RAW file is just the ones and zeros used by a computer until those bits and bytes are rendered in some fashion so that the file can be seen.  Default settings do not make a finished file, but just an initial rendering.  How do you want an image to appear when it first opens on your monitor?

Up until this latest Lightroom update the way you set a default was to open an unprocessed RAW file in the Develop module and make the choices (move the sliders, check the boxes, etc.) that you wanted to be applied initially to files taken by a particular camera model.  Then by holding down the Alt/Option key the Reset button changed into “Set Default.”

The 9.2 update changed this process, and the Alt/Option bit no longer works.  If you had created your own specific defaults, these do not carry over into 9.2.

I use three different Nikon camera bodies, a D5, a D500, and a D850.  I had different defaults for each of these, mainly in the amount of sharpening applied, so I needed to recreate these.  It’s actually very easy.

Open any file in the Develop module.  Set the sliders the way you want.  Go to Presets on the left side of your screen, click on the + symbol to save a new preset, and save with a unique name as a User Preset.  I created presets for my three cameras saved with the obvious names of D5, D500, and D850.

Go to the Presets tab in Lightroom’s Preferences.  Check “Use defaults specific to camera model.”

Select your camera and click the Default box immediately below.   Click Preset, then select the User Preset you made for that camera.

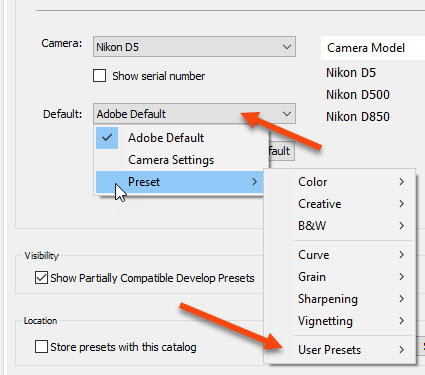
Your default preset shows up and will be automatically applied to files taken with that particular camera. 
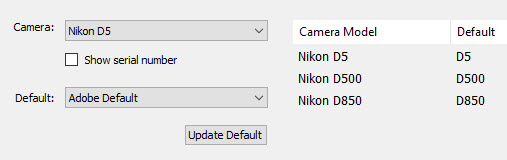


A QUICK PHOTOSHOP TIP

Get a high res monitor recently?  A friend of mine did, and called me complaining about how small the icons and fonts appeared when he went to use Photoshop.  He had overlooked a feature introduced back in Photoshop CC 2019.  In previous versions of Photoshop if you did Edit > Preferences > Interface you had the option to select the user interface font size.  What was added in CC 2019, and is still often not noticed, is the option to scale the UI to the font size.  Make the font larger, and the user interface and icons also get larger.

Note that you have to restart Photoshop to make the change take effect.

2020 LIST

A “to do” list to start off the new year…

  •  Backup all your files.  And back them up again, storing at least one copy in a secure off-site location.
  •  Purchase at least two USB powered hard drives for travel backup (larger capacity that what you might already have, since file sizes are increasing while drive costs are going down).
  •  Check the clock setting in your camera.  Especially important if you use the date when renaming files on import, as I do.  Are the time zone and daylight savings on/off correct?
  •  Go through all the other menu settings in your camera.  One person on my last photo tour discovered he had not reset back to RAW after doing some family snaps at jpeg/small.  Ouch.
  •  If your camera has a “my menu” feature, set it up and use it.  These are just bookmarks so you don’t have to search for settings you often change.
  •  Clean all your camera gear, both bodies and lenses.  Vacuum out bags and backpacks — you might be amazed how much dust and grit is inside your bag (and in my case, hair from our extremely furry Pomeranian!).
  •  Clean your tripod.  Grease the leg lock threads.  If you use a ball head, spray some WD40 on a rag and hold it against the ball while rotating.  Clean out the groves in Arca Swiss clamps and plates.
  •  If you use Photoshop, check the Color Settings.  For some unknown reason I’ve seen Photoshop updates occasionally change the working color space to a default of sRGB.  I know this has happened with both Windows and Mac machines.
  •  Learn at least one new Lightroom or Photoshop technique.  A personal recommendation:  get Greg Benz’s Lumenzia for luminosity selection and masking, https://gregbenzphotography.com/lumenzia/.  
  •  Make two “equipment repair” kits, one for your car and one for travel.  Hex keys, jeweler’s screwdrivers, perhaps an extra tripod foot, some gaffer’s tape, etc.
  •  If you plan on traveling out of the country, check the expiration date on your passport.  And, for that matter, your driver’s license also.
  •  And I’ll mention it again, backup your files.

NEW DESKTOP COMPUTER

Three weeks ago I got a new desktop computer to replace my “old” one.  Both were custom built machines, both made by Primisys, a small IT company in Oregon.  My “old” computer was built just over five years back and at the time was pretty much state of the art.  32 GB RAM, a one TB solid state drive for programs, and two 2 TB internal spinning drives for data.  All my images were kept on an external JBOD (Just a Bunch Of Drives) connected by via an eSATA card.  Of course, all the images were backed up — two copies — on other standalone drives.

But…it was getting a bit slow when faced with stitched Nikon D850 files, the graphics card needed to be undated, and the JBOD concept was giving me some worries about future compatibility.   Well, OK, to be brutally honest I just wanted to indulge myself with a new computer.

A few facts:  I’m not a gamer and I don’t do video and have no plans to indulge in either.  Consequently I wanted a computer primarily for running Lightroom and Photoshop, and one that would easily handle very large files.  I wanted a graphics card with enough VRAM for some of the newer third party software based on AI (such as Topaz’s DeNoise AI), and discrete drives for (a) programs, (b) the Lightroom catalog and its ever-growing lr.data file, (c) data (stuff from Office 365, my downloads folder, teaching programs, etc., etc., etc.), and (d) recent images.  And I wanted a quiet machine, since I would be sitting close to it in my office.

After a good bit of discussion with Aaron Welliver at Primisys we agreed on the specs.  I said “do it,” went off on a shoot for two weeks, and got home to the new box.  OK, for the other computer nerds out there — notice that I count myself in that group — here is a list of what I got.

Gigabyte Z390 Aorus motherboard
64 GB Corsair Dominator Platinum RAM
Intel Core i7-9700k processor
OS drive: 1 TB M. NvMe solid state drive
Lightroom drive: 2 TB NvMe solid state drive
Three 6 TB Western Digital Black 7200 RPM drives (one for data, two for images)
Nvidia Quadro 4000 Pro graphics card with 8 GB RAM
Seasonic Prime Titanium 650 watt power supply
All of this in a Fractals Design Define R6 case
Windows 10 Pro

I have the same wireless keyboard and monitors connected (two NEC PA 27-inch displays), just as before.

I’m extremely pleased with my new computer.  It’s exactly what I wanted; it’s fast, powerful, and very quiet.  The only hassle was reinstalling programs and transferring data, which took a couple of days.

I rarely need to open any of my older digital images, so these are now on a couple of standalone USB3 drives.  If I would need access to one of those files, my Lightroom catalog would tell me the image was off-line and all I would have to do is plug in the correct drive.  No big deal for the few times I might need to do so.  I file all my images in a year/month/shoot organization, and the standalone drives are labeled.  After cleaning out my old “data” drives, I realized that I really had less than three TB of “data” that I needed to keep.  Consequently, my new 6 TB “data” drive is now subdivided into two folders, one for “data” one with about two TB of “images.”  I ended up with roughly eight TB of images copied onto the new computer, with the third 6 TB drive totally clean to start 2020.  And, it goes without saying, it’s all backed up (and before you ask, I use ViceVersa Pro, a Windows-only program, for file comparison and backup).

Primisys Computers & Network, www.primisys.com.

GEAR

I admit it:  I own quite a lot of camera gear.  Currently four camera bodies, well over a dozen lenses, a whole selection of tripods and heads, and camera bags filling an entire closet just by themselves.  It’s not that I’ve got Gear Acquisition Syndrome…I certainly don’t purchase lenses and cameras just because new lenses and cameras become available.  I would rather put the money into travel and time in the field.

I don’t haul around all my gear, which is a problem I’ve seen with some photographers attending workshops and tours.  They have so much stuff with them that they spend more time deciding what to use than time actually spent taking photos.

Even though I like camera gear I’m not emotionally attached to it.  I don’t keep stuff I don’t use.  And I don’t believe the rational that “well, I might use this sometime so I had better keep it.”  If I can’t rationally justify actual usage of the equipment, then it’s gone.

So why do I have so much stuff?  (Off topic comment:  anyone else remember the George Carlin “Stuff” routine?)  As a professional photographer I shoot all sorts of nature subjects, from mountains to mosquitoes.  Subject matter dictates camera and lens choices.  A few months ago I was is southern California for the “superbloom.”  As I write this I have about a week before I leave for the Pantanal in Brazil, which will be basically a long lens critter session.  I drove to California, so I could load my truck with whatever gear I though I might need.  Getting to the Pantanal entails three long flights and two all-too-lengthy airport layovers for a total of 30 hours nonstop travel time from my house.  I had five lenses with me in California, and will be hauling four lenses to Brazil.  But the only significant bit of equipment common to both shoots:  a D850 body.  I will add the battery pack — not needed for California flowers — in order to increase the frame rate for bird and mammal action in the Pantanal.  I’ll even have a different tripod and head, and a different camera pack, rather than what I used in California.  Horses for courses, as the saying goes.

I wouldn’t expect an auto mechanic to have only one wrench, or a surgeon to have only one scalpel.  Cameras and lenses (and tripods and tripod heads and filters and all the other things) are just tools.  You pick the right tool for the right job and for the right results.

Notice the last three words as they are the important ones:  the right results.  If you are satisfied with what you get from your cell phone camera, then by all means use your cell phone.  If you’re pleased with images from your 28-400mm lens, then go right ahead.  If you like what you get from your M4/3 or other format, great.

While I want to remain competitive in the professional market, most of all I want to please myself.  I’m happy with my gear, and happy with the results.

TILT/SHIFT OR FOCUS STACKING

I’ve received several emails asking about the differences between focus stacking and shooting with a tilt/shift lens.  Here’s the short answer: these are two very distinct techniques.  Focus stacking is a means of gaining sharp depth of focus (more near-to-far sharpness in the photo) while shooting at prime apertures.  Focus stacking can be done using any lens.  On the other hand, a tilt/shift lens is a specialized fixed focal length lens that permits changing where the plane of focus is positioned.  Nikon, for example, offers 19mm, 24mm, 45mm, and 85mm tilt/shift lenses.

To do focus stacking you take several images with your camera mounted on a tripod, all at the exact same exposure, but at different focus distances into the frame.  These shots must then be combined using software (my choice is Helicon Focus as it has a RAW IN – DNG OUT mode).  You’re basically getting a lot more depth of field, a lot more of the scene in focus, without resorting to small apertures and the resulting diffraction problems.  But, as always, there is a catch…or I should say, several catches.  The first is subject movement from frame to frame.  Software can fix some minor movement problems, but try photographing on a windy day and you’ll end up with a blurry stack.  Another problem happens when you have one frame with a close in-focus object positioned against a distant out-of-focus background, which has to stack with the reverse, the close object now out-of-focus but with an in-focus background.  The resulting stacked image often shows an obvious halo around that close object.  Focus stacking works best where there is a smooth transition of the subject you want sharp in the final composite image.  Just in passing, both Helicon Focus and Zerene Stacker, the two most popular focus stacking software programs, yield much better results that does Photoshop’s “auto-align, auto-blend” option.

Tilt/shift lenses do not give you more depth of field.  As I said above, they allow you to reposition the plane of focus.  And they are expensive.  Nikon’s 19mm, while a superb lens, is about the same price at a D850 body.  But using tilts means you can fight the wind, to get the shot in one frame rather than trying to put together several frames.  Use a tilt to position the plane of focus across a field of flowers, and a medium aperture works to cover the entire scene.  There is no software option that duplicates what a tilt movement does in a single frame.  As to shift — sliding the lens left-right or up-down — this effect can be accomplished in software by warping or distorting an image, but with the result of stretched pixels and the need to crop off part of the original image capture.  No big deal if you keep the resulting image small but certainly noticeable in a large print.  Tilt/shift lenses also allow you to use both tilt and shift simultaneously; the newer t/s lenses allow these movements to be in the same axis or at 90 degrees to each other.  As always, what’s best depends on your style of shooting, your subject matter (architectural work almost demands using a shift to avoid keystoning),  and what you want to do with your images.

My quick advice is to stick with focus stacking, or at least until you can verbalize a concrete reason to purchase a tilt/shift lens.  However, if you have GAS (Gear Acquisition Syndrome) and some expendable income I can easily imagine a tilt/shift lens in your future.

Superbloom

As was well reported, southern California experienced a “superbloom” this year.  I drove down from my home in Oregon and spent just over a week photographing at two locations relatively close together: the Carizzo Plain National Monument, and a site just north of the California Poppy Reserve.  And yes indeed, the flowers were a spectacular sight.  I wanted to work locations that were not overrun with “petal peepers” (as one of the news reports named the thousands who visited certain spots) and my choices worked out well.  Neither location offered nearby motels, but having a truck camper let me stay on-site and be out both early and late.

The biggest problem I had was weather.  More specifically, windy conditions.  This was especially true at my poppy site.  The fact that a wind farm is located right next to the Reserve was certainly an indicator of what to expect.  Focus stacking for depth of field was impossible due to the wind, but having tilt/shift lenses saved me.  Using the tilt feature I could reposition the plane of focus on the flowers for near-to-far focus while still working at an optimum aperture and a low ISO.  Tilts to the rescue!

Here’s a shot from my poppy site, taken with the Nikon 24mm T/S lens.