Category Archives: Hardware

NIKON INTERVAL TIMER

Even use the interval timer feature on your Nikon?  Easy to set with normal shutter speeds, but at speeds between 15 and 30 seconds things don’t work as expected.  Part of the problem lies in Nikon’s definition of the “interval” between shots.  One might expect this to be the time between one frame and the next, the shortest option being one second.  If you wanted to shoot several 30 second frames, at one second apart, the most logical sequence would be 30 seconds exposure, one second interval, 30 seconds exposure, one second interval, etc.  Nope, it doesn’t work that way.  In Nikon-speak the “interval” is the time from the start of one frame until the start of the next, so you need to add that one second to the sequence.  30 seconds exposure, 31 seconds interval, 30 seconds exposure, 31 seconds interval, etc.  Try this, and to your surprise this timer thing still won’t work right.

The problem here is that while the marked shutter speed might say 30 seconds, it’s really slightly longer at 32 seconds.  How come?  Well, shutter speeds on a camera are in stop increments, doubles and halves (the definition of a full “stop,” twice as much or half as much).  But ever notice that the numbers don’t work out that way?  1 second, ½ second, ¼ second, 1/8, 1/15, 1/30…hey, that really should be 1/16 sec., 1/32 sec., 1/64 second, etc.  OK, no big deal going that direction.  But go the other way and count off seconds.  1 sec, 2, 4, 8, 16, 32…even though the camera says 15 and 30.  Set your camera at 15 seconds, and the minimum “interval” is 17 seconds (16 + 1).  At 30 seconds the minimum “interval” is 33 seconds (32 + 1).

To be honest I rarely use the interval timer.  When I want a sequence of long exposures I normally use a Nikon MC-36, a timer cable release, which allows me to set shutter speeds over 30 seconds along with the number of frames to be taken, with the camera on “bulb.”  Just remember that the needed “interval” is in Nikon-speak.

NEW DESKTOP COMPUTER

Three weeks ago I got a new desktop computer to replace my “old” one.  Both were custom built machines, both made by Primisys, a small IT company in Oregon.  My “old” computer was built just over five years back and at the time was pretty much state of the art.  32 GB RAM, a one TB solid state drive for programs, and two 2 TB internal spinning drives for data.  All my images were kept on an external JBOD (Just a Bunch Of Drives) connected by via an eSATA card.  Of course, all the images were backed up — two copies — on other standalone drives.

But…it was getting a bit slow when faced with stitched Nikon D850 files, the graphics card needed to be undated, and the JBOD concept was giving me some worries about future compatibility.   Well, OK, to be brutally honest I just wanted to indulge myself with a new computer.

A few facts:  I’m not a gamer and I don’t do video and have no plans to indulge in either.  Consequently I wanted a computer primarily for running Lightroom and Photoshop, and one that would easily handle very large files.  I wanted a graphics card with enough VRAM for some of the newer third party software based on AI (such as Topaz’s DeNoise AI), and discrete drives for (a) programs, (b) the Lightroom catalog and its ever-growing lr.data file, (c) data (stuff from Office 365, my downloads folder, teaching programs, etc., etc., etc.), and (d) recent images.  And I wanted a quiet machine, since I would be sitting close to it in my office.

After a good bit of discussion with Aaron Welliver at Primisys we agreed on the specs.  I said “do it,” went off on a shoot for two weeks, and got home to the new box.  OK, for the other computer nerds out there — notice that I count myself in that group — here is a list of what I got.

Gigabyte Z390 Aorus motherboard
64 GB Corsair Dominator Platinum RAM
Intel Core i7-9700k processor
OS drive: 1 TB M. NvMe solid state drive
Lightroom drive: 2 TB NvMe solid state drive
Three 6 TB Western Digital Black 7200 RPM drives (one for data, two for images)
Nvidia Quadro 4000 Pro graphics card with 8 GB RAM
Seasonic Prime Titanium 650 watt power supply
All of this in a Fractals Design Define R6 case
Windows 10 Pro

I have the same wireless keyboard and monitors connected (two NEC PA 27-inch displays), just as before.

I’m extremely pleased with my new computer.  It’s exactly what I wanted; it’s fast, powerful, and very quiet.  The only hassle was reinstalling programs and transferring data, which took a couple of days.

I rarely need to open any of my older digital images, so these are now on a couple of standalone USB3 drives.  If I would need access to one of those files, my Lightroom catalog would tell me the image was off-line and all I would have to do is plug in the correct drive.  No big deal for the few times I might need to do so.  I file all my images in a year/month/shoot organization, and the standalone drives are labeled.  After cleaning out my old “data” drives, I realized that I really had less than three TB of “data” that I needed to keep.  Consequently, my new 6 TB “data” drive is now subdivided into two folders, one for “data” one with about two TB of “images.”  I ended up with roughly eight TB of images copied onto the new computer, with the third 6 TB drive totally clean to start 2020.  And, it goes without saying, it’s all backed up (and before you ask, I use ViceVersa Pro, a Windows-only program, for file comparison and backup).

Primisys Computers & Network, www.primisys.com.

Tilt

A regular lens on a DSLR can be focused near or far, but the axis of the lens is always at a right angle to the sensor.  The plane of focus (the slice of space that is in sharp focus) is always parallel to the sensor in the camera.  No matter what, there is only one plane that is in absolute sharp focus, but apparent sharpness can be increased by using a small aperture to increase depth of field.  With a regular lens, if you need more of the image in a single frame to appear in focus your only choice is to shoot at the smaller apertures.  This has two major drawbacks: (1) smaller apertures mean slower shutter speeds.  Try to photograph a field of flowers where you need f/22 for enough depth of field, but f/22 in turn means a shutter speed of 1/15 second, and that’s not fast enough to stop wind movement.  Upping the ISO means the probability of increased noise.  And (2) while you gain depth of field, small apertures introduce diffraction problems, reducing sharpness.  Current high megapixel cameras, with their ability of record small detail, will all too readily show diffraction.

The solution is to reposition the plane of focus, to re-designate where it lies, and in order to do this you need a tilt/shift lens, which allows the front part of the lens to be moved compared to the sensor plane.  The lens plane and the sensor plane no longer have to be parallel, but can be angled or displaced relative to each other.

Now, a bit of theory.  Imagine three planes extending infinitely: the plane of the sensor, the plane of the subject (the part of the image where you want focus to fall), and the plane of the lens.  With a standard lens only two of these planes can ever have a common intersection, because the plane of focus is always parallel to the sensor.  But if you can tilt the lens all three planes can meet in a common intersection and a photographic miracle happens as now the focus plane has been repositioned.

You will often hear that using a tilt creates more depth of field.  Not true.  What a tilt movement does is reposition the plane of focus so that it no longer lies parallel to the sensor.  This in turn creates a wedge-shaped depth of field which increases further away from the camera.  By repositioning the plane of focus, by tilting the lens, part of the image closer to the camera will be in focus and part of the image further away will be in focus simultaneously.  Depth of field is always on either side of the plane of focus, with less depth of field at close focus distances and more depth of field at far focus distances, hence a wedge shape.  A really common belief is that using tilt movement will bring everything in a photo into sharp focus.  Sorry, not true; you still need to stop down.  The amount of tilt does not control depth of field, the aperture choice does that.

First you need to decide where you want to position the plane of focus.  You always tilt the lens TOWARDS this plane, no matter the orientation of the camera body or the subject.  But how do you figure our how much to tilt?  How do you actually set focus?  Setting a Nikon or Canon tilt movement is not the same as how you would work a tilt movement with a view camera due to the differences in the rotational point of the DSLR lenses.  A lot of what you read on the Web applies mostly to view camera work.

So…step by step, here is what I do.

  1. Decide on the most important plane of my subject, where I want to position the focus.
  2. Chose a near point and a far point in this plane of focus.
  3. Set the tilt on my lens to zero (no tilt at all).
  4. Focus on the near point.
  5. Without refocusing, slowly tilt toward the far point until it appears in sharpest focus, and lock the tilt movement.  The near point is now out of focus.
  6. Without changing the tilt, refocus on the near point.  The far point is now out of focus.
  7. Unlock the tilt movement, and slowly move the tilt in the opposite direction than done earlier until the far point appears in sharpest focus.  De-tilting, if you will.
  8. Repeat steps 5, 6, and 7 if necessary until both near and far appear in focus.
  9. Lock the tilt movement of the lens, and trim overall focus if needed.
  10. Select the aperture needed for depth of field.

The two biggest problems I see when people first use tilt/shift lenses are (1) working way too fast — using a tilt/shift lens should be slow and methodical — and (2) dialing in far more tilt than needed.

TRIPOD SNOWSHOES

A few days from now I’ll be at Crater Lake National Park for some winter landscape work.  Crater Lake is a reasonably short drive for me, so I can easily coordinate the timing of my trip with the weather.  I want fresh snowfall and no wind.  One thing is sure: as usual for this time of year there is already a lot of snow on the ground.  A quick online check tells me that as of today there is 72 inches of snow at the headquarters building and a lot more at higher elevations.  I’ll need my snowshoes so I don’t disappear into the drifts, but what about my tripod?  How do I keep it from sinking into the snow?

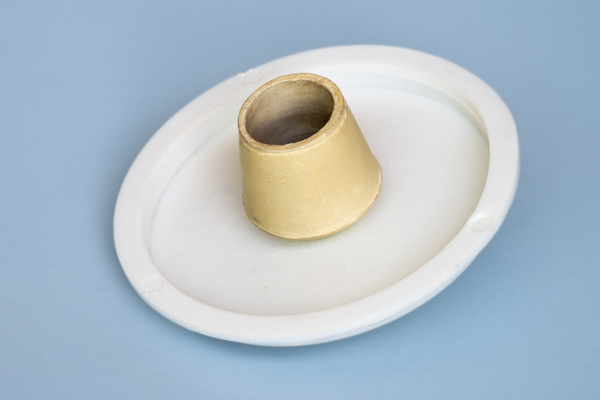
While you can purchase readymade tripod snowshoes, it’s quite easy to make your own set for just a few dollars.  I did this years ago, and the first ones I made still work just fine.  Head to your local home improvement store and purchase the following:

  • Three slip-on furniture-leg tips (also known as crutch tips) in a size just large enough to slip snugly over your tripod feet.
  • Three one-inch long bolts, the nuts for them, and six flat washers that fit the bolts.
  • Three flat plastic test caps (look in the plastic pipe section).  Mine are for 4-inch pipe and cost around $1 each.

Drill a hole through the center of each leg tip, and through the middle of each plastic test cap.  Take a bolt, add a washer, and thread it through the hole in the test cap, then add a second washer and nut and tighten.  That’s all there is to it.  Make three of these, shove them over the tripod feet, and you’re good to go.  Just as you will sink a little into the snow when you’re wearing snowshoes, your tripod will also, but it won’t sink out of sight in powder snow as it would otherwise.  In deep snow start with the tripod legs less than fully spread.  As you push the tripod down into the snow, the snow itself will force the legs apart.

A well-used tripod snowshoe.

NEW LAPTOP

A couple of months ago I realized that it was time for a new laptop computer. I don’t use a laptop when I’m in my office, where I have a serious desktop machine with attached NAS and JBOD boxes. My use of a laptop is almost exclusively when I’m on the road for photography purposes, and all too often this involves air travel. What I wanted in a new laptop was:

  • fast i7 chip
  • 1 TB SSD
  • discrete video card
  • minimum 16 GB RAM
  • three USB3 ports
  • backlit keyboard
  • best laptop screen possible
  • 15 inch display
  • HDMI connection
  • as small and light weight as possible
  • I’m a long-time Windows user, so not a Mac

I wanted to be able to run Lightroom and Photoshop at the same time, along with a basic Office setup (Word, PowerPoint, and Excel) and a few other programs (ViceVersaPro, FileZilla, and SnagIt).

I looked at various laptop websites, and finally placed an order for the new Dell XPS 15 (model # 9550) which, thanks to its “infinity edge” display, has a 15 inch screen in a 14 inch sized laptop. Ah, relatively small and light weight. Here’s a link to Dell’s website page: http://www.dell.com/us/p/xps-15-9550-laptop/pd. Dell offers the laptop with a choice of a 4K 3840 x 2160 pixels touchscreen or a non-touch 1920 x 1080 one. I ordered the high-res 4K touchscreen as it is one of the few laptop screens to cover the entire Adobe RGB space. I will admit that as soon as I received the laptop I immediately turned off the “touch” option. I don’t want fingerprints all over the screen, and I much prefer using a mouse (and I hate using a trackpad for anything). I might mention that I found the same laptop but with a lower price tag at Best Buy, and Dell honored the lower number through their Price Match offer.

I’ve been vary pleased so far, with no problems at all. It’s a Windows 10 machine, which was a new OS for me as I’ve been running Windows 7, and will continue to do so on my desktop computer as I see to reason to change something that’s performing perfectly. Adapting to Windows 10 was very easy, no big deal at all. I did download Dell’s Feature Enhancement Pack in order to keep the keyboard backlighting from timing out as quickly as it did. I calibrated the screen using an i1 Display Pro, and for you nerds out there the DeltaE was .6 which is impressively accurate.

The major concern I had was how software would appear on that 4K screen. Pixel dimensions of 3840 x 2160 means a lot of very tiny pixels in a pretty small area. Think about it: an image that is 1000 pixels on the long dimension is still going to be 1000 pixels long on a 4K display, but because the pixels themselves are smaller, the image is going to appear physically smaller on-screen.  On an old 1024 x 768 screen of the same physical size as that of my new Dell those 1000 pixels are almost all the way across the screen. On this 4K one, it’s a lot less. Web and Office pages are easy to scale; hold down Ctrl and use the scroll wheel on your mouse. There’s no problem at all with Lightroom and Photoshop if you use the CC versions, which I do, as both of these automatically scale up the user interface.

However, not all programs can be scaled up so for many photographers the non-touch screen might be a better option. Bridge is one of those programs. The print is really small. Of course you could reset the high-res screen to a lower resolution, but that defeats the purpose of getting it in the first place. Nik filters do not scale, nor do most of the Topaz ones. As a confirmed Lightroom user I almost never use Bridge, so that’s no big deal. I do occasionally use Nik Dfine (almost always at its default settings) and sometimes one particular combination of filters in Color Efex Pro (a combo of Tonal Contrast and Detail Extractor at a very low amount). I set the Nik filters to always open at my preferred choices so all I have to do it tap OK rather than try to read the tiny print. Again, if you’re a big user of Nik or Topaz, the non-touch screen might be the better choice.

I made those Nik filter settings by using the Windows Magnifier, which allows temporarily zooming around the screen image. One quick way to access the magnifier is by using  the Windows key + “+” (the Windows key along with the “plus” key). You can set the level of magnification you wish to use.  Windows key + Esc turns the Magnifier off.  Google “Windows Magnifier” for more into.

If you looked at the specs noted on the Dell page, you would have seen that the laptop has one HDMI port, two USB3 ports, and a new USB-C port which supports both USB3 and Thunderbolt 3. I carry a little HDMI to VGA adapter just in case I have to connect to an older digital projector. I also picked up a couple of USB-C to USB3 adapters.

The only weird thing I’ve discovered is that the Hoodman Steel USB3 card reader I’ve used with my previous Windows 7 laptop was not recognized when I plugged in into one of the USB3 ports. I downloaded a new driver from Hoodman, and still no luck. But when I plugged the Hoodman into the USB-C port using an adapter the card reader was immediately found. Go figure. I picked up a new Lexar card reader, and the laptop saw it immediately no matter which port I used. The laptop does have a built-in SD card reader, and in my informal test this one is very fast.

As with all new computers, I would strongly suggest looking for updates to the operating system and BIOS. As I said above, no problems so far. And yes, I think it was the right decision for what I needed.

SMALL BOAT, BIG LENS

What’s the best way to use a big lens — something like a 500mm or 600mm — when photographing from a small boat?  Here’s the sort of boat I’m talking about.

Handhold that big lens?  Sure, you can get a shot or two off, but handholding a really large lens is almost impossible to do for any length of time.  The minute you relax and lower the lens is exactly the moment you should be shooting.  Set up a tripod?  A tripod is almost impossible to use, if you are in a situation where you cannot move around.  Try this experiment:  sit with your tripod mounted big lens directly in front of you at eye level, as if you were sitting in a small boat.  Now swing the lens hard right, and without changing your body position, try to look through the viewfinder.  Bet you can’t do it.  And if your tripod doesn’t have a centerpost it’s almost impossible to raise or lower the shooting height.  You’re stuck with photographing to your left side at one camera height.  Don’t even try to aim the lens at much of an up angle, unless you want to turn your body into a pretzel.

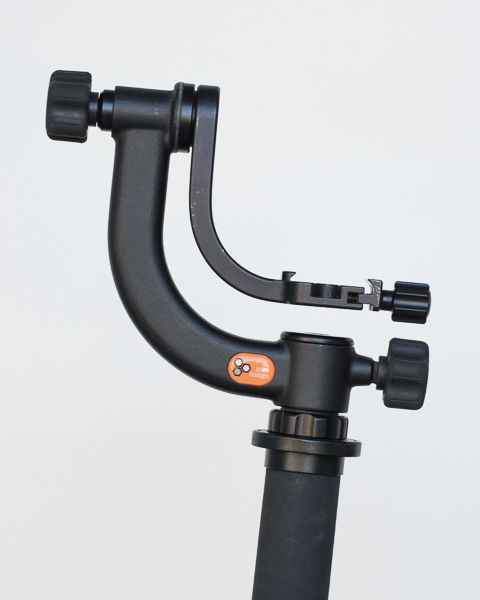
My solution may seem a bit strange at first, but it works really great.  Use a monopod with a gimbal head mounted.  My preferred setup is the Manfrotto 681B monopod (the flip-locks make it easy to lengthen or shorten the monopod using just one hand, while you support the camera/lens with the other) plus the Jobu Jr 3 Deluxe gimbal head (the smallest and lightest gimbal, ideal for travel).

I’ve used this combination a lot from small boats, and also from open sided safari vehicles, while working with my Nikon 500mm and both the “old” Nikon 600mm G and my “new” Nikon 600mm FL lens.  Balance the lens in the head as you would whenever you use a gimbal.  Lock the gimbal’s horizontal rotation, as you can just turn the monopod from side to side.  Leave both the swing arm, and the lens’s tripod collar, unlocked.  You can now easily aim the lens in any direction, side to side or up and down, and raise or lower the shooting height.  The advantage of the gimbal head over a “monopod head” is that with a gimbal the lens remains balanced even when the control knobs are loose.   Hold the monopod with one hand, and your lens doesn’t flop forward or backwards as it would with an unlocked “monopod head.”  With the gimbal mounted on a monopod you’re always ready to shoot.

Yes, I know this seems unconventional, but just try it to see if it works for you.  And by the way, I absolutely love the “new” Nikon 600mm FL lens…in my estimation the sharpest long lens I’ve ever used.

Scanner Part Two

I’m rather shocked that my previous scanner post has generated so many emails (42 have landed in my mailbox so far).  To answer everyone at once:

As far as I know, there are almost no dedicated 35mm film scanners currently made, but then I have no reason to keep up on the scanner market.  I’m not looking for a new scanner, and I don’t pay attention to what is out there.  I bought my Nikon Coolscan 4000 back in 2001, and it still works just fine for my purposes.  If for some reason I need a higher res digital file from a transparency, I ship the film out to have a drum scan made.  And  no, I don’ t want to sell my Nikon scanner.

I’m not in the market for different scanner software.  Yes, I know about SilverFast and VueScan, but I see no reason to purchase additional software when I’m satisfied with the results I get with NikonScan.  This is especially true since I make very few scans per year.

I’m not scanning my entire film archive, nor do I have any intention of doing so.  I only make a scan, or send out for one, when I have a very specific need (which is not nearly as often as you might expect).  Indeed, why would I even want to scan all my old transparencies?  Assume that I have 200,000 images (not such a big number, since I’ve been photographing professionally for almost 45 years now!).  Total time it takes to make one scan (pull image, remove dust, make scan, replace film, enter resulting digital file into database with caption info, etc.): about two minutes under the very best of conditions (not including any Photoshop time needed on the resulting file).  OK, 200,000 images @ 2 minutes/image = 400,000 minutes, or just over 833 days straight, working 8 hours per day with no breaks.  No thanks.

And…I actually already have thumbnail images of all my slides.  The slide itself is a thumbnail.  Hold up the slide, look at it.

Nikon Scanner

Yesterday I had to scan a Velvia slide from my files.  Yes, for those of you don’t remember the “old” days, there was a thing called “film” which had to be digitalized before you could use Photoshop on the image.  A film scanner was the answer.  But, a dedicated 35mm film scanner (rather than a flatbed scanner with a film holder) is now quite a rare beast.  I’m not sure such a thing is even manufactured any more.  I have a long discontinued Nikon Coolscan 4000, which is certainly adequate for magazine-sized reproduction.  The problem, however, is getting the scanner to work with any current computer operating system.

I’m running Windows 7 64-bit on both desktop and laptop machines, but Nikon scanner software was written many years before this OS.  I guess I could have kept an old computer around, but no thanks, I don’t want to do that.  So how have I been able to use my scanner — infrequently though I do — along with Nikon Scan software on my current machines?  Ah, Google to the rescue.  Type in “how to use a Nikon scanner with Windows 7 64” and this link appears (there are other links but this is the one I used):

Follow the directions, and all is well.  Don’t have Nikon Scan software?  It’s still available for download directly from Nikon’s website.

Hummers

I couldn’t resist.  Earlier this year, while on my way to the Galapagos, I stayed over in mainland Ecuador for a few days to photograph hummingbirds.  Hummers have been worked a lot, but they are magnificent little birds, and, since I was in a location with many species, why not spend a few days photographing?  As I said, I couldn’t resist.  Here’s a short slideshow.

Buff-tailed coronet hummingbirds.Booted racket-tail hummingbirdPurple-throated woodstar hummingbird.Fawn-breasted brilliant hummingbird.Green violetear hummingbird.Rufous-tailed hummingbird.Violet-tailed sylph hummingbird.Buff-tailed coronet hummingbird.Rufous-tailed hummingbird.Rufous-tailed hummingbird.Buff-tailed coronet hummingbird.

For hummingbirds on perches:  Nikon D800E in 1.2 crop mode, 500mm lens with an extension tube (for closer minimum focus), plus a bracket-mounted flash with Better Beamer flash extender attached, flash output between -1 and -2 fill.  Matrix metering, aperture priority (so shutter speeds were between 1/60 and 1/250 sec.), ISO 1000 (low light where I was photographing), f/11.

For hummingbirds in flight:  Nikon D4 with 80-400mm lens, manual exposure, ISO 400, 1/250 sec. at f/11.  In order to freeze the wing movement, I needed to light the entire scene (no fill flash here) using very short flash durations.  This is actually easy to get: set a regular flash on manual output at about 1/16 power and position the flash relatively close to the subject.  I used four flashes: one on-camera (set at an even lower power output), two on light stands aimed from either side toward where the birds would fly into a feeder, and one on another light stand and aimed at an artificial background (a print of out-of-focus vegetation).  To determine flash position, and consequently the f/stop to use, take a shot and take a look at the camera’s LCD.  The on-camera flash triggered all the other flash units; in other words, the flashes were simple slave units.  Since I was the only person working the area my flashes did not interfere with any other setup, otherwise I might have needed radio flash triggers which I don’t own.

I might note that most Nikon flashes can be set in an SU-4 mode, which allows them to act as basic optical slaves with any brand of camera.  Slave flashes certainly don’t need to be current models.  I have a Nikon SB-80DX (discontinued 10 years ago) which I picked up brand new in the box about a year ago for $25.

T/S Stitch

I like photographing with my Tilt/Shift lenses.  Besides using them for single image photos, I’ll often use them to make stitched images.  I keep the tilt and shift functions in different axis, so that I can tilt to reposition the plane of focus, and still be able to shift left and right.  If my camera is mounted in a horizontal position, the resulting image when stitched in Photoshop is in a panoramic format.  But if I mount the camera vertically, and then shift left and right, the final image is just slightly squarer than 4 x 5 proportions.  Why do this?  Easy answer: file size.  With my D800E, the final 16-bit file is roughly 400 MB.

Autumn maple leaves.In the Bald Hills, Redwoods National Park.Sandstone wall, Nevada.Torres del Paine, Chile.Columbia Gorge, Oregon.White Sands National Monument, New Mexico.Valley of Fire, Nevada.Columbia Gorge, Oregon.Snow in the Sonoran desert, Arizona.Abraham Lake, Alberta.