Author Archives: John

LIGHTROOM AND DUST SPOTS (AGAIN)

Back in January 2014 I wrote a blog piece about Lightroom’s “Visualize Spots” feature, which had just been introduced with the then-new Lightroom 5.  Well, here we are five years later and at Lightroom Classic CC version 8.2.  I recently finished teaching a workshop and was somewhat shocked that over half the attendees — regular Lightroom users — did not know about Visualize Spots.  So to repeat myself….  Visualize Spots does exactly as its name suggests; it shows you all the dust spots on your image, including many that you might otherwise miss.

In the Develop module, select the Spot Tool.  It’s the second tool from the left in the Develop tool bar (the keyboard shortcut for the Spot Tool is Q).

Look at the bottom left, just below your image, and you will find the Visualize Spots checkbox.  Click on this, your image changes to black and white, and all those dust bunnies show up.  Move the Visualize spots slider to increase or decrease the sensitivity, and start spotting.

You can change the size of the Spot Tool by using the scroll wheel on your mouse.  You can change the feathering of the tool by holding down the Shift key while using the scroll wheel.

And now a neat little trick: set your image view at 100%, or 1:1, and navigate to the upper left corner of your image.  Use Page Down (Windows: PgDn on a full-size keyboard; Mac (and most Windows laptops): Function + down arrow) to move the area shown on screen by exactly one screen view.  When you get to the bottom of the image, do Page Down again, and the screen view moves over and up to the top.  Keep doing Page Down until you’re covered the entire image.  This little trick means you’ll never miss any section of the image.

FOCUS PEAKING WITH T/S LENSES

The Nikon D850 offers “focus peaking” in Live View with manual focus lenses, or AF lenses used in the manual focus mode.  “Focus peaking” overlays a colored highlight on the Live View image to indicate areas that are in focus.  Rotate the focusing ring on your lens to change focus and you’ll see the colored overlay move across the Live View image.  Great…except that most of the time I do not use manual focus with my lenses, as I stick with AF.

But my Nikon Tilt/Shift (T/S) lenses do not have autofocus; they are manual focus only.  And T/S lenses are notoriously difficult to focus when tilt is used, as this movement changes where the plane of focus lies.  As you add tilt, the plane of focus is no longer parallel to the camera back, but angles away from the camera, changing the near/far relationship.  In landscape work you’re generally tilting away from the camera, then stopping down the lens to cover depth of field on either side of the plane of focus.  Hitting the right amount of tilt can be tricky, tricky, tricky.  Ah, focus peaking to the rescue.

Here’s how to use focus peaking in Live View with a T/S lens.

  •  Select a color for the overlay in Custom Setting d8.  Chose from red, yellow, blue, or white.  Personally I like the red option.
  • Turn on Live View, then tap the button and scroll up or down until you find PEAK.  Select this and then chose one of the options in the peaking level menu: 1 (low sensitivity), 2 (standard), or 3 (high sensitivity).  The higher the setting, the greater the depth shown as being in focus.  I would suggest setting 1.
  •  Determine the near and far points in your image where you want the plane of focus to lie.
  •  With no tilt applied, focus on your chosen near point and the peaking color appears.
  •  Do not refocus, but slowly apply the tilt movement until your selected far point comes into focus and is highlighted with the peaking color.
  •  Without changing the tilt amount, refocus on the near point until it is highlighted.
  • Without refocusing, slowly apply the tilt movement in the opposite direction than you did before.  In other words, you are “de-tilting” the lens.  You will hit a point where both near and far areas will show the peaking color.

That’s it!  You might have to tweak the final focus just a tiny bit, but using focus peaking as an aid makes hitting the correct amount of tilt a lot easier.

PHOTOSHOP CUSTOM MENUS

I was recently doing a Lightroom/Photoshop processing demo and got asked about the appearance of the menus in my version of Photoshop.  How come some of the menu choices shown on my laptop were highlighted with different colors?  And how come the menus on the attendees’ computers had more choices than I had?  The answer was simple:  I had customized the menu choices for my particular needs.

Photoshop has seemingly a million options in each of its menus, but having so many choices can easily become overwhelming and daunting.  Just how many of these choices do you actually use?  I bet there are a lot of options that you never use, especially since Photoshop was not designed specifically for us photographers.  Why not hide the items you don’t need, and highlight the select ones you use the most?  You can easily do this by using the custom menu editor.  How do you access this special option?  Sure enough, it’s one of those many (but often overlooked) menu items.  In Photoshop click on Edit and look down at the bottom of the drop down list.

Click on Menus to open the custom menu editor, and make sure it is set for Application Menus.  Click the triangle in front of File, Edit, Image, Layer, etc., and you will see all the menu items under that particular header.  Click on the color option to add or change the highlight color for each item.  Click on the eyeball, the visibility icon, to show or hide each item.


Note the second line at the bottom:  “Show All Menu Items” will be appended to the bottom of a menu that contains hidden items.”  Those hidden items are, of course, the very ones you turned off by clicking the eyeball icon.

When you’re done, click save or save as.

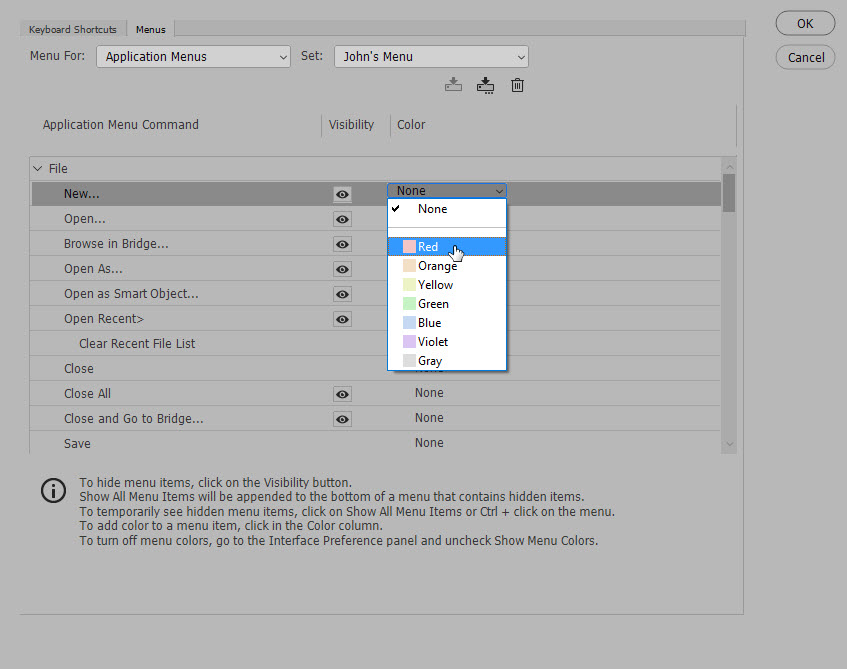
You can see that I saved my choices as “John’s Menu.”  You can switch back to the original Photoshop version at any time by selecting “Photoshop Defaults” in the “Set” drop down.  You can make as many custom menus as you want, although I don’t know why one would do this.  To delete a custom menu, select it in “Set” and then click the trash icon.

SPOONBILLS

So what else have I been photographing this year?  In March I made a trip to Florida to work on select bird species.  I had not been to Florida since 2006, when I was using a Nikon D2x.  Spoonbills were one of the subjects I wanted.  I got to spend five shooting days at a nesting colony.  Here’s just a taste of the results, all taken with my Nikon D5 and Nikon 600mm lens.

Summer/Winter

It’s been a hot summer where I live in Oregon.  Too hot as far as I’m concerned.  I’m not a fan of really warm weather, much preferring the “fleece pullover needed” sort of days.  When I read a recent email calling me to task for not posting any images for quite a while…well, I looked back at what I’ve done photographically so far this year.  Perhaps looking at some winter photos will help me cool off.

In late January I made a trip to Bryce Canyon National Park, specifically hoping to time my trip with a snow storm predicted for the higher elevations in southern Utah.  I was hoping to get images of fresh white snow on the red Bryce formations, well knowing that such conditions wouldn’t last long.  I got lucky and made it to Bryce just as the snow was about to hit, and photographed at Bryce for the next six days.  Opening my Lightroom catalog and reviewing images taken on that trip certainly makes me feel better (it’s in the upper 90s here today!).

Of course I took a lot of overviews of the Bryce amphitheater, but I was drawn to the trees clinging to the canyon rim.


A winter morning at Bryce Canyon.


Tree on Bryce Canyon rim


Tree on Bryce Canyon rim


Tree on Bryce Canyon rim

NIKON D850 LENS PROFILE PROBLEM?

Recently I was doing some night sky photos using my D850 and the Nikon 20mm f/1.8.  When I looked at the shots in Lightroom I noticed something odd: in the darker areas, especially toward the corners of the frame, a series of faint concentric rings were visible, apparently emanating from the center of the image.  I did not have any sort of filter on the lens, so this could not be some sort of interference pattern.  What was happening?

I started doing a lot of testing.  I finally discovered that these “rings” would disappear if I unchecked the “lens profile correction” in the Lens Corrections tab in Lightroom’s Develop module.

Was this a bad lens profile or what?  I considered some options:

  • I first noticed this while working on my laptop which has a high resolution 4K screen.  Was this just a monitor artifact?  I opened the same files on my desktop computer which has a much larger, but slightly lower res monitor.  Nope, the circles were still there when “lens correction profile” was on.
  • Was this only a factor of high ISO in dim light?  I needed some control shots, done in dim light.  With my camera firmly mounted on a tripod I snapped a series of images inside my garage with the garage door closed and the overhead lights turned off.  I kept the lens at f/2 and went from ISO 100 to ISO 12800 in one stop intervals, with shutter speeds from 30 seconds up to 1/4 second.  The rings were still visible in all the images when I turned on the “correction profile.”
  • What about shooting in more “normal” lighting conditions?  I went outside and shot a series looking down my street, at different exposure values and different ISOs.  I could not see any problem in the images when the profile was on or off.
  • What about aperture settings in dim light?  Back to the garage and another series of frames, this time done at ISO 6400 and apertures from f/2 to f/11.  No change, turn the profile on and the rings were still there in all the shots.
  • What this a problem with the 20mm?  What about other wide angle lenses?  More shots in the garage, this time with my Nikon 14-24mm.  As soon as the lens profile was applied in Lightroom I could see the rings, although fainter.  I also tested the only other wide angle lens I own, the Nikon 16-35mm, and the rings were back.  Again, if I unchecked “lens profile correction” the rings disappeared.
  • What about the lack of an anti-aliasing filter on a high-res body?  I no longer own a D800E or a D810.  I didn’t own the 20mm f/1.8 back when I had those cameras, but I did have night sky shots taken with the 14-24mm.  I pulled those up, looked at them carefully, and flipped the profile correction on and off.  No rings no matter if the correction was on or off.

What on earth was going on here?  Was this a problem specific to the D850?

Now totally frustrated, I looked at my Develop settings in Lightroom.  If sure would be great to be able to use those lens profile corrections to solve the distortion and vignetting problems that all wide angle lenses have.  I discovered that if I set the sharpening Amount slider to zero the rings disappeared, but in my normal RAW file workflow I generally do want to apply some sharpening.  Back at the Lens Profile tab, I left the “profile correction” on, but pulled the sliders for Distortion and Vignetting at the bottom of that tab to zero, effectively negating the profile.  Sure enough, the rings disappeared.  But wait…how about separating those two sliders, adjusting one but not the other?  The culprit seemed to be the Distortion slider.  I could have the Vignetting slider all the way to the right, as high as possible, but the moment I moved the Distortion slider from the zero position the rings started to show.

As I stated earlier, I’ve only seen this in very low light shots, and haven’t tried any tests with longer focal lengths.  Has anyone else shooting with a D850 seen similar results?  Right now I’m thinking that when I’m processing images taken with the D850 in very low light I will leave lens profile correction turned on, but pull that Distortion slider to the far left before slowly moving it to the right.

Nikon MB-D18

So what’s an MB-D18?  To use Nikon nomenclature, it’s the “multi-power battery pack” for the D850 camera.  It’s the add-on grip that lets the D850 hit 9 frames/second (versus the 7 fps the camera alone tops out at).  Well, 9 fps if you also add a battery from a D4 or D5 camera and the special BL-5 battery chamber cover needed to mount that battery into the MB-D18.  Of course you’ll also need a charger for that battery.  Wowza — this adds about $1000 out of pocket to get two more frames per second.  So is it worth the expense?

The answer is simple and is the same exact answer I give to all photographic questions:  it all depends.

Let me stop right here and make one statement:  if I could only have one camera right now to photograph landscapes and wildlife and everything else, my choice would be a D850.  Is it a great landscape camera?  The best I’ve ever used.  Is it a great wildlife camera?  While it’s a good wildlife camera, I do think the D5 is a better choice for someone who is a wildlife specialist.  But like I said, if I could only have one camera, then give me a D850.

So back to the MB-D18.  Adding it does make shooting vertical compositions a lot easier, but at the same time it bulks up the size of the camera quite a bit.  Plus the total weight of the camera increases a lot depending on which “multi-power” source you use.  Two battery trays come standard with the MB-D18, one for an additional EN-EL 15 battery (the same as used in the camera body itself), and one for eight AAs.  Neither of these change the frame rate; the camera still tops out at the default 7 fps.  You’re simple adding additional power time to the camera.  In my opinion you can just leave that AA tray in the box.  But you should have an extra EN-EL 15 battery no matter what, and adding the second one in the grip really extends shooting time.

Landscape photographers certainly don’t need a faster frame rate, but having an additional battery in place, along with the one in the camera body, might help occasionally.  I can think of several scenarios:  extended time lapse shooting, hours of star trail photography, and severe cold weather work.  I was in Jasper National Park in February when it was minus 30° F.  It was difficult enough at that temperature to change a lens let alone a camera battery.  As a side note, the D850 worked perfectly at 30 below, no problems.  My own ability to function, or even semi-function, was the problem.

It’s that 9 fps option that really adds expense, so the nitty gritty question is whether you really need 9 fps or not.  When photographing wildlife every frame counts, so the answer might be “yes” if wildlife plays an important part in your photographic plans.  So, yes, I did purchase an MB-D18 along with a BL-5 battery cover.  But then I already have a D5, an extra EN-EL 18a battery for the D5, and the D5 charger, so the additional expense was not as much as it might have been.  Here’s a little money saving story:  I like having a second charger to leave in the camper I have on my truck, but the $370 for another MH-26a (the charger that comes with the D5) put me off.  A couple of quick phone calls to dealers and I found a used MH-26 (the charger that originally came with the D4 bodies) for a whopping $44.  Now that’s more like it.

So, do you really need 9 fps?  If so, go for it.  If not, take that $1000 you saved and spend it on a photo trip.

Some thoughts on the D850

So, is the Nikon D850 the only camera you need?

In my opinion the answer to this question is the same as the answer to most photographic questions:  it all depends.  I do think the D850 is a great camera.  And if I could only own one current camera, it would be my choice.  But should it be your choice?  In my opinion your decision should take in hand these questions:

  • What do you do with your photographs?  By far, most images taken are either shown on a smart phone or tablet, or posted on the Web.  At these image sizes any camera works great, witness the fact that the vast majority of all images shot today were taken with a phone.
  • Do you really need all those megapixels?  Do you make large prints?  Really?  Do you make prints at all?  Do you own the computer power to process large files (and a D850 file with a few layers in Photoshop quickly swells to over a GB).
  • Are you primarily a bird and wildlife photographer?  The D5 definitely yields better high ISO performance at ISO 6400 and up, while both the D5 and D500 offer faster frame rates.  Sure, at roughly $950 you can soup up the D850 to 9 fps, but you end up with a camera that is slightly larger, and slightly heavier, than the D5.  Are weight and size considerations for you?
  • Do you see the D850 offering you more cropping possibilities?  The D500 is basically the same pixel density as the D850 at a considerably lower price.  If you’re thinking about the D850 in order to crop heavily, perhaps the D500 makes more sense, especially when you could put the difference in price toward additional lenses, or a better tripod, or a photo trip.
  • Can you give some specific reasons why getting a D850 will improve your photography?  What will it allow you to do that you cannot do with your present equipment?
  • And of course, can you afford the purchase price of the D850, along with new cards or computer drives or other additional expenses?

OK, I guess there is one more point than comes into play, which certainly did for me when I ordered the camera.  I rationalized that at my age I deserved a treat.  I’m not so young anymore (in all honesty, I’m in the “duffer” or “geezer” or “old guy” category), I’m not a car fanatic (although I love my truck and camper), nor am I a druggie or drunkard (although I do like a single malt in the evening).  So I figured I could indulge myself.  Yep, a rationalization for sure.  But I definitely like the D850!

Nikon D850 Focus Shift

I’ve been using the Nikon D850 since October and can say I’m very impressed with the camera, particularly for my landscape work.  Two features in particular stand out:

  1. The “silent shutter” mode in Live View.  I should mention that I use Live View a lot when I’m photographing static subjects, and it’s a given that I’m working from a sturdy tripod.  In “silent shutter” the shutter is fully electronic — hence no shutter curtain movement at all — and of course when in Live View the mirror is up.  Eliminating the mechanical shutter and eliminating any mirror movement means eliminating two sources of possible vibration.  Turn on “silent live view photography” in the Photo Shooting menu, and select Mode 1 which gives a full-resolution, non-cropped image.
  2. The “focus shift shooting” option, also found in the Photo Shooting menu.  Here the camera takes a series of shots, slightly changing the focus point for each frame.  The resulting images can be “stacked” as a composite, thus increasing the in-focus area of the final photo.  This “stacking” must be accomplished with software in post-production; it’s not done by the camera.  The individual photos can be taken at a lens’s sharpest aperture, around f/5.6 or f/8, eliminating diffraction problems while yielding greater depth of field.

Turning on “focus shift shooting” gives you a number of choices:

  • The number of shots (up to 300)
  • The focus step width (1 through 10, undefined what these actually mean)
  • The interval until the next shot (between 0 and 30 seconds)
  • Exposure smoothing
  • Silent photography
  • Starting storage folder

Here are my choices, for landscape work:

  • Number of shots:  Set this to around 50, as the number really doesn’t matter.  The camera will stop with the lens focusing ring hits the end of its travel.  I have my camera set at 50 and most of the time the actual number of usable frames is between 5 and 10.  FYI, you will often find some extra frames where the camera has gone before the far point in your composition, so nothing is in sharp focus.  No big deal, just delete these frames when you see them later on your computer.
  • Focus step width:  I have mine set at 2, as I want to work at those prime apertures on my lenses, so I want to make sure each frame’s depth of field overlaps with that of the preceding or following frame.
  • The interval until the next shot:  I have this at 0.  And VR is “off” on the lens in use.
  • Exposure smoothing:  Off, as I do all my focus stacks in manual exposure so that all the frames already match in total exposure.
  • Silent photography:  On.
  • Starting storage folder:  I don’t use this.

So here is the easiest way I know to work.  Leave “silent shutter in Live View” turned on.  Add “focus shift shooting” to My Menu, and position it as the top most listing.  In the Custom Settings menu, Custom Control Assignment (choice number F1 in Custom Settings), set the Fn2 button on the camera rear to “access the top item in My Menu.”

In the field, turn on Live View, compose your image, set the exposure, and focus on the nearest past of the frame.  Press Fn2, select Start, and the camera begins shooting in silent mode.  When you’ve done this once, if you don’t need to change any options, the next time you can just press Fn2 and then OK twice.

Just to cover yourself, shoot several stacks of any one composition.  How to tell where each stack beings?  Wave your fingers in front of the lens and shoot one frame in Live View before you push Fn2.  Important reminder (and I speak from experience here):  remember to refocus on the closest point for each stack.

OK, now to the actual stacking.   I’m assuming you’re shooting RAW files, and you are, right?  You could use Photoshop.  If so, you need to first process the individual images and then open them as layers in Photoshop.  Select all the layers and do Edit > Auto align followed by Edit > Auto blend.  This method works OK, but there are two problems:  the final file is no longer a RAW file, and with complex subjects you will probably discover a number of stacking artifacts (blurry areas, that is).

In my opinion, a better choice is to use a separate stacking program and I would recommend Helicon Focus.  Google for a discount code to knock the price down about 20%.  Helicon works directly from Lightroom, and if you install Adobe’s free DNG Converter, Helicon has a mode called Raw In – DNG Out.  You export the selected images from Lightroom to Helicon in their original RAW state.  I’ve found that almost all the time running Helicon at its default settings works fine.  Most of the time Helicon’s rendering intent mode B is my choice.  If it leaves artifacts I try mode C.  When Helicon finishes, the resulting file can be saved right back into Lightroom as a DNG, and processed to taste as you would any RAW file.

2018

In my last blog I stated that I was debating about continuing writing here.  After a lot of though I’ve decided to do so.  I still remain depressed and fearful as to the current political situation here in the US.  My feelings are not just as a citizen but also as a nature photographer.  This past week two National Monuments were opened for “development,” although I’m not quite sure that “development” is the correct way to say “mining” and “resource extraction.”  Being a nature/wildlife photographer is only possible when there is actual nature and wildlife to photograph.  Shrinking the size of natural areas, privatizing parks and recreation areas for profit, selling off public lands, and repealing clean air and clean water regulations directly effect all of us who photograph the natural world, no matter our personal political views.  I strongly urge readers to get involved in both local and national conservation efforts.